Quantcast
Channel: ServerMom
Viewing all 159 articles
Browse latest View live

How to Install Fail2Ban on CentOS

$
0
0

This guide explains how to install Fail2ban software, an intrusion prevention framework on your CentOS 7 (and 6) vps easily so you can protect your server from brute-force attacks. I previously posted some basic configs for a new CentOS server including to change default SSH port and to disable root login directly. But however sometimes that would be not enough. Brute-force attack may occur continuously, hence you need to ban the source IP of that attack so it will not happen continuously or at least the attacker will need many IPs. Meed Fail2Ban that exists originally for that purpose, to protect your server from SSH brute-force attack.

Fail2ban works by scanning and monitoring log files for selected entries then bans IPs that show the malicious signs like too many password failures, seeking for exploits, etc.

Out of the box Fail2Ban comes with filters for various services (apache, courier, ssh, etc).

How to Install

Step 1 – Login to your server as user with root privilege.

fail2ban-centos

Step 2 –  For your information, Fail2ban is not available by default in CentOS so you can’t install it directly via yum. Hence, you have to firstly add EPEL repo:

CentOS 6:

rpm -Uvh http://dl.fedoraproject.org/pub/epel/6/x86_64/epel-release-6-8.noarch.rpm

CentOS 7:

rpm -Uvh http://dl.fedoraproject.org/pub/epel/7/x86_64/e/epel-release-7-1.noarch.rpm

pic, screenshot on CentOS 7:

fail2ban-centos-add-repo

In case if those repo URLs are not working, you can fine the latest one here.

Step 3 – Now install it using yum:

yum install fail2ban -y

fail2ban-centos-install

and once done you’ll see something like this:

fail2ban-centos-installed

How to Configure Fail2Ban

Step 4 – So now fail2ban is installed on your VPS, what next to do is setting up some basic Fail2ban configuration. Here I’ll show you a very basic setup. Now firstly copy default configuration file:

cp /etc/fail2ban/jail.conf /etc/fail2ban/jail.local

This task is necessary so you can edit configuration locally (your own setting) without messing up with default one. There are lot of possible services that may need protection are in the jail.local file already.

fail2ban-centos-copy-config

Step 5 – Now edit jail.local file you copied. Use your favorite text editor like Nano or vi.

nano /etc/fail2ban/jail.local

You’ll then firstly see something  like this:

fail2ban-centos-default-config

Step 6 – Scroll down the page for all available configuration. There are few lines act as basic setup you can edit as necessary to suit your need including: ignoreip, bantime, findtime, and maxretry. You can read what each line means in the explanation available there.

fail2ban-centos-jail

In the “ignoreip” line you can define several IPs to whitelist so fail2ban won’t lock out that IP. Here you can add your personal / home IP address in case if your forgot your own password to login to your server. You can separate each address with a space.

Step 7 – Now restart Fail2ban so the new configuration can take effect.

CentOS 7:

systemctl restart fail2ban.service

CentOS 6:

service fail2ban restart

fail2ban-centos-restart

That’s it. Enjoy..

This post How to Install Fail2Ban on CentOS is part of ServerMom.


5+ Free Self-hosted Server Monitoring Tools

$
0
0

I’ve posted about 20 free site uptime monitoring services which all of them are operated, served and hosted by third-parties. They are all free with amazing features but however you have limited control. Most of them will only monitor whether your server / website is down or up and send you notification. This time I’ll show you few free alternative tools which you can host it on your own server. Yet, most of what I’ll tell you below are not only capable to track whether your server is in up or down state but also monitor CPU load, RAM usage and Disk usage.

Before we start, all of these tools are self-hosted so you gonna need a server to host the script. Need some recommendation? check out my previous post here or here.

Prerequisite

  1. Grab a Linux-based server to host the script
  2. You also may need to install a webserver and mysql server, check my other useful articles: Ubuntu or CentOS.

Let’s start the list with Mojeda.

1. Mojeda Server Status

mojeda

Mojeda is a script based on BlueVM’s uptime checker script that uses Bootstraps for theming and progress bars. I put this script as the first one because many others developed based on the same idea. The script will monitor your servers and display the status in one page including each Up/Down status, Server Name, CPU load, RAM and Disk usage. The script needs a webserver, PHP5 and mysql server. Installation and usage is pretty easy and straightforward. Currently its developer is still working for version 3 that has more awesome interface. See the demo here.

Visit: https://github.com/mojeda/ServerStatus

2. Nikkiii Status

nikkiii

The same purpose as Mojeda’s status script but it has really different script. The script requires Net/Ping, SQLite3, PHP Module, statsend,and jstatsend. Installation is considered a little bit advanced but the result is really worth it. You can see demo here.

Visit: https://github.com/nikkiii/status

3. Munroenet ServerStatus

munroenet

Forked from Mojeda, Munroenet’s server status script has similar interface but the coding part inside its core script is different. It only requires a webserver and PHP5 without mysql server (database). So far this uptime script is the easiest one to install even for newbie. Demo can be seen here.

Visit: https://github.com/Munroenet/ServerStatus

4. BotoX ServerStatus

botox-script

This script is a full rewrite of mojeda’s ServerStatus script, which in turn is a modified version of BlueVM’s script. The developer made this because of his dislike about few original Mojeda’s script like: requires webserver and PHP for every client, query clients for every user that visits the site, messy codebase, progress bar animation skips, setup process complicated, hangs when said clients don’t respond, loading slow with many servers. Installation is pretty easy and it doesn’t require a webserver to run. Need demo? See it here.

Visit: https://github.com/BotoX/ServerStatus

5. Loading Deck Monitoring

Key features of this software include server resource monitoring, application monitoring, (very) good performance and highly flexible alerting policies. I’ve found no page using this script for demo. So you tell me.

Visit: https://github.com/LoadingDeck/Monitoring

Most of those above come with no notification feature. Here’s some other alternatives:

6. Uakfdotb Bearmon

Bearmon is a simple server monitoring tool designed to require minimal configuration. It is able to send notification to contact defined in case if one of monitored server goes down.

Visit: https://github.com/uakfdotb/bearmon/

7. fzaninotto uptime

This script is a remote monitoring application using Node.js, MongoDB, and Twitter Bootstrap. The tool has very cool key features like: easy installation and zero administration, Tweak frequency of monitoring on a per-check basis, up to the second, Receive notifications whenever a check goes down via status page, by email and via console, etc.

Visit: https://github.com/fzaninotto/uptime

Know another tool? Don’t hesitate to tip me and I’ll update the list.

This post 5+ Free Self-hosted Server Monitoring Tools is part of ServerMom.

How to Install Kloxo-MR on CentOS VPS

$
0
0

Kloxo-MR is another alternative of free web hosting / server control panel that can be solution for you who don’t want to manually install webserver, MySQL and PHP. The software is basically a fork of original Kloxo CP by LXCenter. The MR part of Kloxo-MR is Mustafa Ramadhan, the one who did the fork, enhance and develop this truly modified version. I posted that Kloxo users should be more aware because it has recently got new exploit but then Mustafa Ramadhan claimed that Kloxo-MR is not vulnerable with the same exploit.

I was never use Kloxo (and Kloxo-MR) before not because it’s bad but Kloxo is too complete for a free web panel. It has a bunch of advanced features making new users a bit frustrated in using it for the very first time. But then I decide to write a tutorial about it and I choose Kloxo-MR.

Why Kloxo-MR?

Did I explain it’s not too vulnerable already? Now it’s time to check its key features which I think too complete and best of all you can get it without paying a penny. Let’s check out:

  • Supported OS: Redhat / CentOS 5 and 6 (32bit and 64bit) or their variants
  • Billing Software: AWBS, WHMCS, HostBill, TheHostingTool, AccountLab Plus and Blesta (note: claim by billing’s author)
  • Web server: Nginx, Nginx-Proxy and Lighttpd-proxy; beside Httpd and Lighttpd (in progress: Varnish, Hiawatha, ATS and Httpd 2.4) *)
  • Php: Dual-php with php 5.3/5.4 as primary and php 5.2 as secondary (in progress: multiple-php) *)
  • PHP-type for Apache: php-fpm_worker/_event and fcgid_worker/_event; beside mod_php/_ruid2/_itk and suphp/_worker/_event
  • Mail server: qmail-toaster instead special qmail (in progress: change from courier-imap to dovecot as imap/pop3) *)
  • Database Server: MySQL or MariaDB
  • Database Manager: PHPMyAdmin; Adminer, MyWebSql and SqlBuddy as additional **)
  • Webmail: Afterlogic Webmail Lite, Telaen, Squirrelmail and Roundcube; Horde and T-Dah dropped
  • FTP server: Pure-ftpd
  • DNS Server: Bind and Djbdns; ready testing for Powerdns, MaraDNS and NSD *)
  • Addons: ClamAV, Spamassassin/Bogofilter/Spamdyke and RKHunter
  • Fixed many bugs of Kloxo Official (including security issues)
  • And many more!

Prerequisites

Some stuff you need before installing:

  1. A VPS or Dedicated Server (DS) running CentOS. In this tutorial I use (recommended) CentOS 6 x86_64 minimal.
  2. Ability to use SSH Client like Putty (or Terminal on Linux and Mac)
  3. Basic knowledge of Linux command
  4. About 30 minutes of your spare time
  5. A cup of Coffee or Tea if you like.

How to Install

Step 1 – Login to your server as root:

2014-09-19_093638

Step 2 – To make sure all things are updated, run ym update command:

yum update -y

wait for the process to complete

2014-09-19_095959

Step 3 – Issue this command to install some necessary packages:

yum install yum-utils yum-priorities vim-minimal subversion curl zip unzip -y

2014-09-19_100307

Also this one:

yum install telnet wget -y

2014-09-19_101734

Step 4 – Make sure SELinux is disabled. You can check it with this command:

setenforce 0

sample output:

2014-09-19_102048

if not, you can disable it using this command:

echo 'SELINUX=disabled' > /etc/selinux/config

Step 5 – Now you can add repo URL of Kloxo-MR. Currently -during I write this post- there are two main version: v6.5.0 and v7.0.0. This guide will show you how to install Kloxo-MR v7.00. Start by changing directory to /tmp.

cd /tmp

then remove old .rpm if any:

rm -f mratwork*

Then download the repo file using wget:

wget https://github.com/mustafaramadhan/kloxo/raw/rpms/release/neutral/noarch/mratwork-release-0.0.1-1.noarch.rpm --no-check-certificate
rpm -ivh mratwork-release-0.0.1-1.noarch.rpm

pic:

install-kloxo-centos

then go back to upper directory

cd /

Step 6 – Now issue these series of command before we proceed to the install process:

yum clean all
yum update mratwork-* -y

pic:

2014-09-19_141317

2014-09-19_141448

Step 7 – Now begin the install process with this command:

yum install kloxomr7 -y

2014-09-19_141820

Once done you’ll see something like this:

2014-09-19_141950

Step 8 – Now the last magic command to issue is:

sh /script/upcp

That will install everything so the process will be a little bit longer than any previous command above so sit tight and wait till it finished.

2014-09-19_142240

And once done you’ll see something like this:

2014-09-19_142847

Step 9 – Now open up your favorite web browser and login to Kloxo-MR admin page for the very first time:

https://1ip-address:7777 – secure ssl connection, or..
http://1ip-address:7778 – normal one.

Default username is admin and password is admin.

kloxo-mr-admin-login

That’s it. Wait for my next article. Do not forget to follow Servermom on twitter or download my official Android app.

Next article:

Kloxo-MR basic configuration

How to host your first website on Kloxo-MR.

This post How to Install Kloxo-MR on CentOS VPS is part of ServerMom.

Kloxo-MR Basic Configuration

$
0
0

So you installed Kloxo-MR already on your CentOS VPS. What’s to do next? Here it is some initial tasks you can follow to have some basic setups of your Kloxo-MR-powered server before hosting your websites on it.

Previous Guide:
How to Install Kloxo-MR on CentOS Server.

Step 1 – Open up Kloxo-MR default login page on your browser. It is accessible via your server’s IP address:

https://1ip-address:7777 – secure ssl connection, or..
http://1ip-address:7778 – normal one.

Default username is admin and password is also admin.

kloxo-mr-admin-login

Step 2 – After that you’ll be prompted to change default password. This is crucial to avoid your server being hacked easily.

kloxo-mr-change-password

Step 3 – Once logged in, you may also have to change small php.ini parameters.

kloxo-mr-change-php-ini

Edit some basic configs in the first tab:

2014-09-26_184310

Click the Update button then go to the “Advanced PHP Configure” tab where you can edit some other necessary PHP configuration like to enable/disable Allow URL FOpen, change PHP max execution time, change PHP memory limit, maximal file size allowed to upload, etc.

2014-09-26_184448

Once done, click the update button.

Step 4 – Now go to Basic menu > Web Server Configure. You can choose which PHP version to run and whether to use multiple PHP version or not. Do not also forget to define which PHP Type you want to use (php-fpm, suphp, etc).

2014-09-26_185424

2014-09-26_185857

Step 5 – Enable LxGuard to add more basic security layer of your Kloxo-MR server. Go to Security menu > then LxGuard.

2014-09-26_190344

Step 6 – Do not forget to set the identification name for your mail server so public mail servers like gmail, hotmail and yahoo will not automatically reject emails from your server. In the top menu click Basic > then Server Mail Settings.

2014-09-26_190806

Step 7 – Change default Kloxo-MR login port so no one will attempt to brute-force the login page. Go to Advanced > Port Configure. Use any unused ports:

2014-09-26_192654

Step 8 – Next, add your first DNS Template via Resource > DNS Template menu:

2014-09-26_193759

Step 9 – Next, you may also need to change default SSH port (22) to avoid bruteforce login. Go to Security menu then SSH Configure (also read: Basic CentOS Configuration).

2014-09-26_194348

Step 10 – Add your first resource plan via Administration > Resource Plans (this acts like Hosting Packages / Plans at many web hosting providers). Each value is up to you.

2014-09-26_195635

Step 11 – Instead using default admin login, it is better to also create user. A user is a user account with limited privilege and ability which you set already according to which package that user is assigned to (e.g: Basic plan). You can create many user accounts for yourself, your family, friends or even clients (e.g: sell webhosting service). To create one, go to Task menu then click Add Customer:

2014-09-26_200304

In this example I assigned a user to basic plan I created earlier.

2014-09-26_200418

Once created, that user can login to Kloxo-MR panel using the same login URL as yours (admin).

That’s all.

Next guide: Adding your first website on Kloxo-MR.

This post Kloxo-MR Basic Configuration is part of ServerMom.

$25/year 1GB RAM DDOS-Protected VPS @ DaringHost

$
0
0

With $25/year you can get a 1GB RAM VPS with free 4 Gbps / 4 Mpps DDoS Protection – Daring host is not quite known brand in Low End industries but they claimed been in business for 4 years. Their US datacenter is located at Steadfast Network. Node server is powered with Supermicro Hotswap Chassis + Motherboard, Intel E3-1230 V2, 32GB RAM, 4 x 2TB Western Digital RE4 Hard Drives in RAID 10.

The deal:

  • CPU: 2 Cores
  • RAID 10 Disk Space: 30GB
  • Dedicated Ram: 1GB
  • Burstable Ram: 2GB
  • Bandwidth: 2TB
  • 4 Gbps / 4 Mpps DDoS/DoS Protection Included Free
  • IPv4 Addresses: 1
  • IPv6 Addresses: 5
  • Virtualization: OpenVZ
  • Price: $5.00 Per Month or $25/year with promo code leb25
  • Order link – Select annual payment on the order form then enter promotion code.

The 4Gbps or 4Mpps of Dos/DDos protection is located right in Chicago and is NOT back hauled through LA, Canada, or any other location. This means you will not notice an increase in latency. I personally never try their service so regarding performance you tell me.

This post $25/year 1GB RAM DDOS-Protected VPS @ DaringHost is part of ServerMom.

$13/year 128MB Xen PV VPS @ drServer

$
0
0

drserver-ninja

Have you ever found cheapest offer of a VPS powered with Xen PV instead of KVM or OpenVZ? So far I knew that major cheap yearly VPS offers are built powered with OpenVZ and some are KVM-based. But meet drServer, a Xen-specialized VPS provider running business -and well-known- in Low End segment. They have many brands running under their well-known name: drServer.net, ByteShack.net and the newly introduced DirtCheap.Ninja.

The Deal:

  • 2 CPU Powerful CORES
  • 128 MB RAM
  • 2GB HW RAID 10 SSD (6drives array)
  • 250GB @ 1gbs
  • 1 IPv4
  • 3 IPv6
  • Datacenter in Dallas TX
  • Xen PV virtualization
  • Special price: $ 12.99
  • Official deal page.
  • Order Page.

About Xen PV

Xen Paravirtualization (PV) is an efficient and lightweight virtualization technique introduced by the Xen Project team, later adopted by other virtualization solutions. Xen PV does not require virtualization extensions from the host CPU and thus enables virtualization on hardware architectures that do not support Hardware-assisted virtualization. PV delivers higher performance than full virtualization because the operating system and hypervisor work together more efficiently, without the overhead imposed by the emulation of the system’s resources.

Other interesting plans:

  • 64MB RAM
  • 1GB RAID 10 SSD
  • 50GB Bandwidth @ 1Gbps
  • 1 IPv6
  • $0.5/month

You can view all available plans here: https://dirtcheap.ninja/

Personally I simply couldn’t resist my desire to buy the “ninja”. What about you? Bought one? Do not hesitate to share how the ninja can perform.

Update: its performance is not so bad but I can’t say great.

2014-09-29_235322

Ping Test (powered with HE Looking Glass):

core1.ams1.he.net> ping 104.xxx.xxx.189 numeric count 5
  Sending 5, 16-byte ICMP Echo to 104.xxx.xxx.189, timeout 5000 msec, TTL 64
Request timed out.
Request timed out.
Request timed out.
Request timed out.
Request timed out.
No reply from remote host.
# Entry cached for another 31 seconds.

core1.fmt1.he.net> ping 104.xxx.xxx.189 numeric count 5
  Sending 5, 16-byte ICMP Echo to 104.xxx.xxx.189, timeout 5000 msec, TTL 64
Reply from 104.xxx.xxx.189 : bytes=16 time=60ms TTL=58
Reply from 104.xxx.xxx.189 : bytes=16 time=50ms TTL=58
Reply from 104.xxx.xxx.189 : bytes=16 time=53ms TTL=58
Reply from 104.xxx.xxx.189 : bytes=16 time=47ms TTL=58
Reply from 104.xxx.xxx.189 : bytes=16 time=48ms TTL=58
Success rate is 100 percent (5/5), round-trip min/avg/max=47/51/60 ms.
# Entry cached for another 60 seconds.

core1.sin1.he.net> ping 104.xxx.xxx.189 numeric count 5
  Sending 5, 16-byte ICMP Echo to 104.xxx.xxx.189, timeout 5000 msec, TTL 64
Reply from 104.xxx.xxx.189 : bytes=16 time=214ms TTL=61
Reply from 104.xxx.xxx.189 : bytes=16 time=206ms TTL=61
Reply from 104.xxx.xxx.189 : bytes=16 time=213ms TTL=61
Reply from 104.xxx.xxx.189 : bytes=16 time=216ms TTL=61
Success rate is 100 percent (5/5), round-trip min/avg/max=206/212/216 ms.
# Entry cached for another 55 seconds.

core1.ber1.he.net> ping 104.xxx.xxx.189 numeric count 5
  Sending 5, 16-byte ICMP Echo to 104.xxx.xxx.189, timeout 5000 msec, TTL 64
Reply from 104.xxx.xxx.189 : bytes=16 time=158ms TTL=52
Reply from 104.xxx.xxx.189 : bytes=16 time=183ms TTL=52
Reply from 104.xxx.xxx.189 : bytes=16 time=165ms TTL=52
Reply from 104.xxx.xxx.189 : bytes=16 time=166ms TTL=52
Reply from 104.xxx.xxx.189 : bytes=16 time=158ms TTL=52
Success rate is 100 percent (5/5), round-trip min/avg/max=158/166/183 ms.
# Entry cached for another 56 seconds.

core1.ash1.he.net> ping 104.xxx.xxx.189 numeric count 5
  Sending 5, 16-byte ICMP Echo to 104.xxx.xxx.189, timeout 5000 msec, TTL 64
Reply from 104.xxx.xxx.189 : bytes=16 time=53ms TTL=57
Reply from 104.xxx.xxx.189 : bytes=16 time=49ms TTL=57
Reply from 104.xxx.xxx.189 : bytes=16 time=50ms TTL=57
Reply from 104.xxx.xxx.189 : bytes=16 time=49ms TTL=57
Reply from 104.xxx.xxx.189 : bytes=16 time=50ms TTL=57
Success rate is 100 percent (5/5), round-trip min/avg/max=49/50/53 ms.
# Entry cached for another 58 seconds.

core1.hkg1.he.net> ping 104.xxx.xxx.189 numeric count 5
  Sending 5, 16-byte ICMP Echo to 104.xxx.xxx.189, timeout 5000 msec, TTL 64
Request timed out.
Request timed out.
Request timed out.
Request timed out.
Request timed out.
No reply from remote host.
# Entry cached for another 31 seconds.

This post $13/year 128MB Xen PV VPS @ drServer is part of ServerMom.

How to Add New Website on Kloxo-MR CP

$
0
0

So you installed Kloxo-MR already on your VPS and did some basic configuration tasks needed before you can host your website on your server powered with Kloxo-MR as web-based control panel. But how can you do that? Using a web panel / hosting control panel makes it easier to manage your server along with necessary softwares including the web server, mysql/database server, DNS server, and so on. So adding your first website to host with Kloxo-MR is also easy.

Just make sure you firstly:

  1. Install Kloxo-MR CP following my guide before.
  2. Setup basic configuration for Kloxo-MR

Basic Steps to Add New Website On Kloxo-MR

Step 1 – As always, go ahead login back to Kloxo-MR control panel using either admin or custom user created earlier (and assigned to a hosting plan you defined – read back my previous guide).

2014-09-28_103638

You’ll then see the familiar Kloxo-MR dashboard page for that user (something like this):

2014-10-01_212351

Step 2 – Now you can add your first website via the “Domain” tab:

2014-10-01_212731

Then type in your Domain name along with other necessary options following by clicking the Add button:

2014-10-01_213324

Once done, you’ll see this message appears in the top right corner

2014-10-01_213542

Step 3 – Double-check the DNS entries of the newly added website. Click “manage DNS” menu in Domain section:

2014-10-01_214050

From there you can add / delete records or simply make sure everything is fine.

2014-10-01_214341

Step 4 – Now you can point your domain to your server by firstly register NS1 and NS2.yourdomain.tld at your registrar (more information here).

Step 5 – Next, let’s say you’ve developed a ready-to-use and ready-to-upload website. What next to do is to move your websites files from your local computer to your server. Open up File Manager under Resource section:

2014-10-04_043602

Once the File Manager page appears, from there you can manage all your website’s files including some common tasks like creating new files, folders, copy-n-pasting files, deleting and even zipping. As this is your first time adding website, so it should be blank but you’ll see your site’s name directory there. Click on it to enter to that directory.

2014-10-04_044105

Next, click the “Upload” tab in the top:

2014-10-04_044157

From that page you can choose to upload via 3 available methods: Normal, FTP and Remote Upload. In this case I choose Normal method via traditional upload button (click Browse > choose the file > click Upload). However you can try all of those methods, that’s up to you.

Step 6 – To make the whole upload process faster, you better also setup FTP account. Click the FTP Users menu (Or via Task menu > FTP Users) and create one.

2014-10-04_045103

Once created, you can then use your favorite FTP Client like FileZilla to upload and manage your files.

That’s it. I believe everything else is pretty much explanatory. If you already get used to CPanel then you should also be familiar with Kloxo-MR. Do not hesitate to drop your comment below and let me know at which part you don’t understand. Do not forget to follow me on twitter.

This post How to Add New Website on Kloxo-MR CP is part of ServerMom.

How to Install Pydio File Manager on Vesta CP

$
0
0

Comes with no built-in File Manager, Vesta CP is absolutely a great free Control Panel for your VPS allowing you to install all necessary software (Apache, Nginx, PHP5, FTP, MySQL, DNS, etc) to make your VPS ready-to-use for hosting websites. The only way you can upload, organize and manage your files on your server is only via FTP. For some people who are already familiar with cPanel (which is not free control panel), they may prefer to use web based file manager than using FTP client.

With that issue in mind, so here it is I share a nice simple guide with screenshot pics on how to install free web-based File Explorer called Pydio on a VPS running Vesta CP. I’ll try to make this tutorial as clear as possible so you can follow each step confidently because I put screenshot pic on each step.

About Pydio: Formerly known as AjaXplorer, it is an Open Source file manager with a bunch of advanced features like ability to act as file sharing platform. While AjaXplorer itself has been ported for zPanel as a module, Vesta CP users need to install it manually.

Prerequisites

  1. Ability to use Putty or Terminal or similar SSH client app
  2. Basic knowledge about common Linux command.
  3. A VPS or Dedi with Vesta CP installed. Read:

p.s: This guide is done on CentOS 6.5 x86_64 minimal hosted by DigitalOcean, my favorite playground server.

How to Install

Step 1 – Login to your server as root or as a user with root privilege (sudo) via SSH.

2014-10-14_063637

Step 2 – Next, define or create a public directory where you can put all Pydio files so you can access it via internet on your browser.

mkdir -p /var/www/pydio

2014-10-14_065009

Step 3 – Now download Pydio files to that directory but you need to firstly check Pydio’s official download page to check its latest stable version available. In my case it is Pydio v5.2.3. Click on the download link and wait till a download dialog box appears then copy the download url (because you don’t have to download it locally):

2014-10-14_064459

Step 4 – Go to Pydio directory and use wget to grab the file. In my case it is:

cd /var/www/pydio
wget http://softlayer-sng.dl.sourceforge.net/project/ajaxplorer/pydio/stable-channel/5.2.3/pydio-core-5.2.3.zip

2014-10-14_065425

Step 5 – Now extract the Pydio package using simple unzip command:

unzip pydio-core-[version-number].zip

## example of mine
unzip pydio-core-5.2.3.zip

2014-10-14_065651

Step 6 – You’ll now have one .zip file and one folder in that directory. Now get in the newly extracted folder and move all the files and folders up:

cd pydio-core-5.2.3
(shopt -s dotglob; mv -- * ..)

2014-10-14_070043

Once done, you can go back to upper directory and delete the pydio-core-[version-number] directory

cd ..
rmdir pydio-core-5.2.3

2014-10-14_070615

Step 7 – Now you need to chown the directory to your VestaCP username (in my case is admin):

chown -R admin:admin /var/www/pydio

2014-10-14_072339

Step 8 – In order for Pydio can be accessible via Internet, you have to firstly add Virtual Hosts entry (Apache .conf) which in Vesta CP can be done by editing httpd.conf:

nano /etc/httpd/conf/httpd.conf

then scroll down the configuration file to the bottom part and add these:

Alias /pydio /var/www/pydio

<Directory "/var/www/pydio">
        Options FollowSymLinks
        AllowOverride Limit FileInfo
        Order allow,deny
        Allow from all
  	php_value error_reporting 2
</Directory>

Save it and exit (in Nano it is Control+O then Control+X):

2014-10-14_072818

Step 9 – Now restart Apache:

service httpd restart

2014-10-14_073148

Step 10 – Open up your favorite web browser and access Pydio for the very first time either using your domain.tld/pydio or ip-address/pydio:

http://domain.tld/pydio
http://xxx.xxx.xxx.xxx/pydio

You’ll then see Pydio Diagnostic Tool. Check it and you should find everything is OK. Few warning messages are fine. Next, simply click the “Click here to continue to Pydio” link. That page will appears once and I’m sorry I forgot to take screenshot and the page has been redirected to this one:

2014-10-14_073637

Configure Pydio

Step 11 – In the next page, click the “Start Wizard” link:

2014-10-14_073957

Step 12 – Next, you’ll be asked for series of question to setup your Pydio installation including Admin login and password:

2014-10-14_074243

Step 13 – Next, click on Global Options and adjust as necessary. I’ll leave it as it is for now.

2014-10-14_074438

Step 14 – Now go ahead and click the “Configurations Storage”. Choose Database in Storage Type and fill all necessary fields (you can firstly login to Vesta CP admin page and create new database and database user):

2014-10-14_074928

Click the “Try connecting to the database” button and you should see connexion established message.

Step 15 – You can also add some users by clicking “Add some users”:

2014-10-14_075234

Step 16 – Once done, click the Install Pydio Now and you should see the success message:

2014-10-14_075259

Step 17 – You’ll then redirected automatically to the login page:

2014-10-14_075437

Step 18 – In your first login, you’ll be asked to select a workspace:

2014-10-14_075734

You can select Settings to adjust few settings.

Step 19 – Create your very first Workspace, a core feature which can be seen as a virtual drive mounted to access a set of data. You can read the complete article about what is it and how to set it up here.

That’s it for now and I’m so sorry if the end of this tutorial may not be too satisfying because the whole configuration steps will be too long if I put all in one page. Hence I simply link to its official documentation page (Step 19 above).

This post How to Install Pydio File Manager on Vesta CP is part of ServerMom.


How to Install Hiawatha Webserver on CentOS 7

$
0
0

Bored with Apache? Tried Nginx and Lighttpd but still need another alternative web server to challenge yourself? Meet Hiawatha, another free lightweight web server developed by Hugo Leisink under GPLv2 license. Being available for multiple platforms (including Linux of course), Hiawatha is really an advanced, modern, and high-performance webserver that was initially built as a very small web server, suitable for servers with old hardware which in recent hardware it is perfectly run on low end VPS (someone has also managed to run it on Raspberry Pi). It has been written with security in mind which then resulted in a highly secure webserver in both code and features. Shortly saying, it can also do tasks to prevent common hack attempts like SQL injections, XSS, CSRF attacks and old exploit.

More information: Official website - More stories from Wikipedia.

Prerequisites

Some stuff you need before installing:

  1. A VPS or Dedicated Server (DS) running CentOS. In this tutorial I use (recommended) CentOS 7 x86_64 hosted I DigitalOcean (my favorite place to deploy a test server).
  2. Ability to use SSH Client like Putty (or Terminal on Linux and Mac)
  3. Basic knowledge of Linux command
  4. About 30 minutes of your spare time
  5. A cup of Coffee or Tea if you like.

How to Install

Step 1 – Login to your server as root or as user with root / sudo privilege:

Step 2 – There are basically two ways you can get Hiawatha installed on your CentOS 7 VPS: either via packet or compile on your own from source code. To make the process (and this tutorial) faster, I will show you the first method. Now start by installing third-party repo as Hiawatha is not yet available on CentOS 7 distro by default:

wget http://anku.ecualinux.com/20/x86_64/anku-release-8-1.noarch.rpm

hiawatha-1

Once downloaded, you can install it with this command:

rpm -ivh anku-release-8-1.noarch.rpm

hiawatha-2

Step 3 – Now you can install Hiawatha via Yum by enabling the newly installed repo:

yum --enablerepo=anku install hiawatha -y

hiawatha-3

and once done, you’ll see something similar to this:

hiawatha-4

Step 4 – You can try to run Hiawatha for the very first time:

service hiawatha start

hiawatha-5

and when you open your browser and type the IP address of your VPS, you’ll see default web page of Hiawatha webserver:

hiawatha-6

Step 5 – Now let’s create a web directory for your first domain:

mkdir -p /var/www/domain.tld

Go to that directory and create a simple index.html page for testing purpose:

cd /var/www/domain.tld
nano index.html

example of mine:

hiawatha-7

you can simply put simple text in the index.html file. Again, just for testing:

hiawatha-9

Save it and exit.

Step 6 – In order for that index.html file to be accessible online, you have to firstly adjust Hiawatha default configuration file and add few lines to act as Virtual Hosts (vhost block). Before you do that, you better make backup first:

cd /etc/hiawatha
cp hiawatha.conf hiawatha.conf.bak
nano hiawatha.conf

hiawatha-8

Step 7 – As you may see in the config file (if you scroll down more a bit), Hiawatha’s configuration consists of several lines which are actually understandable. But for initial setup, all you have to do is few lines in VIRTUAL HOSTS section.

hiawatha-conf

Do not edit those lines, instead, copy those lines and put after it. You can add # (commented out) to deactivate unnecessary option(s). Example:

VirtualHost {
       Hostname = domain.tld
       WebsiteRoot = /var/www/domain.tld
       StartFile = index.html
#      AccessLogfile = /var/www/my-domain/log/access.log
#      ErrorLogfile = /var/www/my-domain/log/error.log
#      TimeForCGI = 5
#      UseFastCGI = PHP5
#      UseToolkit = banshee
}

In example above, I disable Logfile, use index.html as homepage and I also disable PHP5 because in this tutorial we did not install PHP5 yet.

hiawatha-10

Now Save and exit the editor (Control+O then Control+X in Nano)

Step 8 – Finally restart Hiawatha service:

service hiawatha restart

hiawatha-11

Now you can open up your favorite web browser again and test your newly added website:

hiawatha-rocks2

That’s it. Do not forget to follow me on twitter or download my official Android app to get faster update.

What’s next:

  • How to setup PHP5 fpm with Hiawatha on CentOS 7
  • How to Install and configure MariaDB 5 for Hiawatha on CentOS 7.

This post How to Install Hiawatha Webserver on CentOS 7 is part of ServerMom.

Install and Setup PHP5-fpm and MariaDB for Hiawatha Webserver on CentOS 7

$
0
0

How to install PHP5 (fpm) and MariaDB SQL server on CentOS 7 and how to setup basic configuration for Hiawatha webserver.

I’m currently having great curiosity about Hiawatha (also a bit in love with). Being an alternative webserver for Apache, it is actually not very popular but recently it gets its own increasing numbers of fans. Thanks to its lightweight design, built-in security features and simplicity. There are many reasons to ditch Apache but it needs no reason to switch to Hiawatha. I’ve introduced about it in my previous post and you can read awesome review with great reasons of why you should use Hiawatha here.

This post is the next part of my Hiawatha tutorial series. So I’ll cut the “bla bla bla” part and start with the steps directly.

How to Install PHP5

Just like Nginx, Hiawatha also works nicely with PHP-fpm. And here’s how to get it installed and configured properly:

Step 0Install Hiawatha web server.

Step 1 – Login (back) to your VPS as root (or a user with sudo privilege):

Step 2 – Install PHP5 with fpm along with necessary PHP modules you love. Use command below:

yum install php php-fpm php-common php-cli php-devel php-gd php-imap php-intl php-mysql php-process php-xml php-xmlrpc php-zts -y

Once done, you’ll see something similar like this:

hiawatha-php-1

Setup PHP5-fpm

Step 3 – As we’ll use php-fpm module, so there are few configuration you have to adjust. First, let’s edit php.ini file using your favorite text editor like Nano:

nano /etc/php.ini

then find and edit ;cgi.fix_pathinfo then change it to look like this:

cgi.fix_pathinfo=0

Before:

After:

Once done, save and exit the editor (Control+O then Control+X).

Step 4 – Now we need to set FastCgi to work, edit php-fpm configuration file:

nano /etc/php-fpm.d/www.conf

and edit the line Listen = 127.0.0.1:9000 replace whit this:

listen = /var/lib/hiawatha/php-fcgi.sock

hiawatha-php-2

Step 5 – Scroll down the page a little bit and find pm = dynamic and change that to static.

hiawatha-php-3

Step 6 – You may also need to change pm.max_children value to desired lesser value:

hiawatha-php-4

Step 7 – Change chdir value to /.

hiawatha-php-5

Once done, save changes and exit (Control+O then Control+X).

Setting Server PHP Configuration

Step 8 – Now edit Hiawatha .conf file:

nano /etc/hiawatha/hiawatha.conf

and find this line: #CGIhandler = /usr/bin/php-cgi:php then remove the # part.

hiawatha-php-6

Step 9 – Also, replace these lines:

#FastCGIserver {
#   FastCGIid = PHP5
#   ConnectTo = 127.0.0.1:9050
#   Extension = php
#}

with:

FastCGIserver {
   FastCGIid = PHP5
   ConnectTo = /var/lib/hiawatha/php-fcgi.sock
   Extension = php
}

hiawatha-php-7

Step 10 – Again, you have to also edit your Virtual Host setting (still inside the same file). Look for it and remove the # symbol before the UseFastCGI = PHP5 line. It Should look like this:

hiawatha-php-8

Now you can save changes (Control+O) then exit (Control+X).

Step 11 – Restart Hiawatha and php-fpm:

service hiawatha stop;service hiawatha start;service php5-fpm restart

hiawatha-php-9

How to install MariaDB

Step 1 – Issue command below:

yum install mariadb-server mariadb -y

Step 2 – Start MariaDB service using systemctl command (get used to it):

systemctl start mariadb.service

Also issue this one to make MariaDB run automatically each time your server reboot:

systemctl enable mariadb.service

Step 3 – So its service is now running but there is one thing you should do immediately: configuring MariaDB setup for the very first time like setting up your mysql root password. Issue this command:

mysql_secure_installation

Then you’ll see a series of question, just answer it accordingly. The main important part is to define your root password while everything else is just up to you or you can simply hit the “ENTER” key through each prompt to accept the default values.

You may also need to test your newly installed MariaDB by logging in as root:

mysql -u root -p

That’s it.

p.s: I honestly suggest you not to follow this tutorial in production server. Play with it for a while until you’re in love with it. Enjoy..

This post Install and Setup PHP5-fpm and MariaDB for Hiawatha Webserver on CentOS 7 is part of ServerMom.

Install Varnish 4 To Run With LAMP on CentOS 7

$
0
0

LAMP with Varnish Cache v4 is awesome! This is a tutorial guides you installing Varnish 4 and how to configure it for Apache web server. I’ve explained in my previous article about what is Varnish and why do I strongly recommend it for you especially if your site gets huge amount of traffic. So here in this article I will only show you how to install the new version of Varnish Cache without explain what is it, again. But shortly saying, the main concept of Varnish technology is simple: to improve performance for busy, dynamic web sites by redirecting traffic to static pages whenever possible. That way Varnish can reduce the number of dynamic page calls as well as reducing CPU load. Sounds cool? So if you tried W3 Total Cache or WP Super Cache plugin and you think that’s not enough, then you should give it a try and be amazed!

Prerequisite

  1. A working CentOS server. In this guide I am using CentOS 7 x86_64. Use minimal template if possible. Need recommendation? Try RamNode (which I use in this tutorial) or DigitalOcean.
  2. Windows users can download Putty while Mac and Linux users can simply use Terminal
  3. You’ll also need a basic skill to use Putty and to navigate through SSH. Read: Most common Unix commands used to SSH.
  4. Read and follow my previous guide about how to add and setup new site in Apache on CentOS server.
  5. About 15 minutes of your time and a cup of coffee if you like.

Part 1: Setup LAMP Server

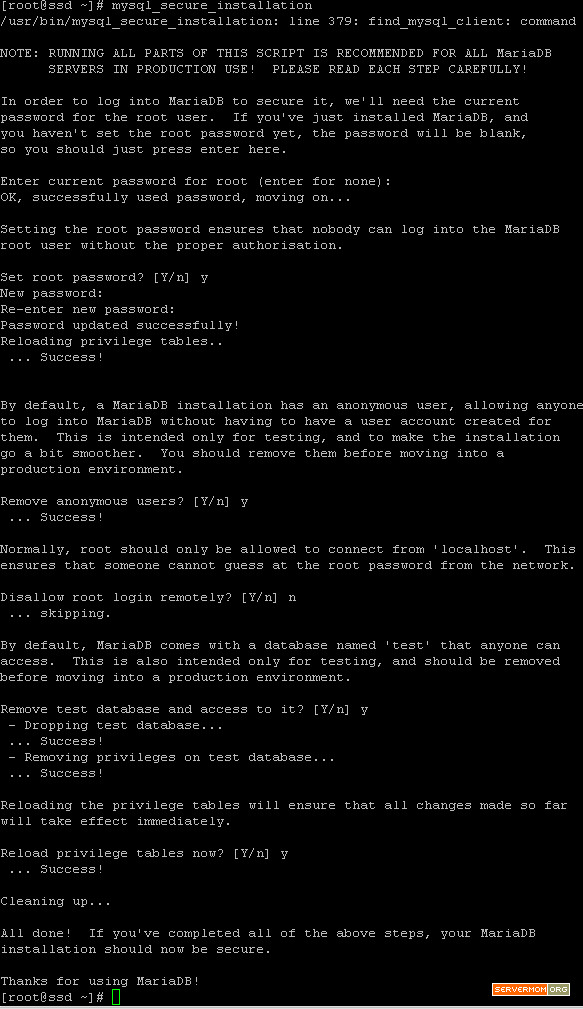
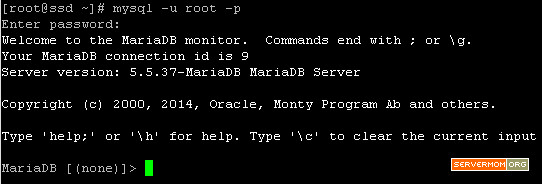
Follow all required steps on my previous tutorial to install Apache, MariaDB and PHP on CentOS 7. However if you already have your own LAMP setup (following other guides) then you don’t have to follow my previous guide. The point here is your server should already has necessary software to host a website. In this case are: Apache, MySQL / MariaDB and PHP.

Part 2: Install Varnish Cache Server

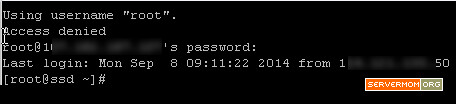
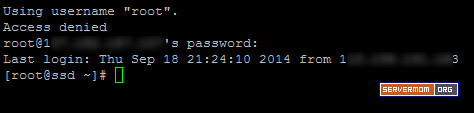
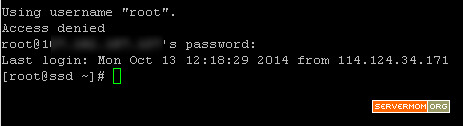
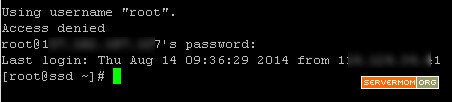
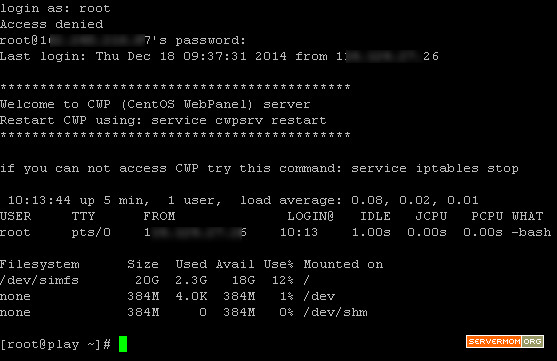
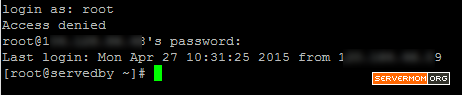
Step 1 – Login to your server via Putty or Terminal. Make sure you logged in as root or as a user with sudo privilege.

lamp-centos-7-1

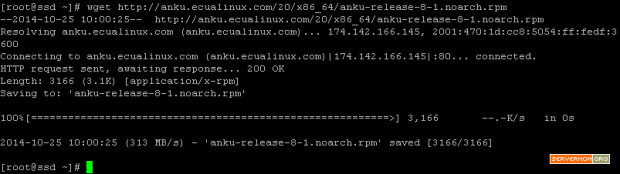
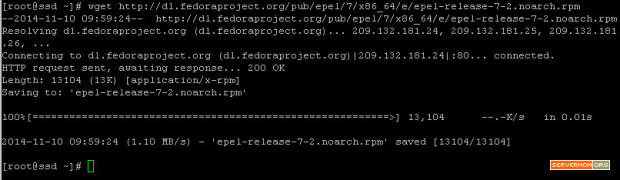
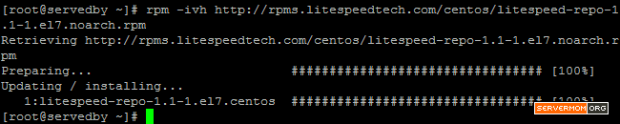
Step 2 – Next,  you have to firstly add / install EPEL repository which is needed to grab Varnish package which is not available by default on CentOS 7. First, download the .rpm file into your server:

wget http://dl.fedoraproject.org/pub/epel/7/x86_64/e/epel-release-7-2.noarch.rpm

varnish-repo

then install the .rpm file with this command:

rpm -ivh epel-release-7-2.noarch.rpm

varnish-repo-install

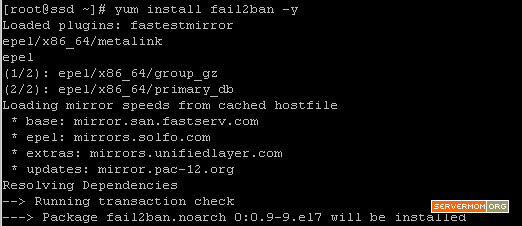
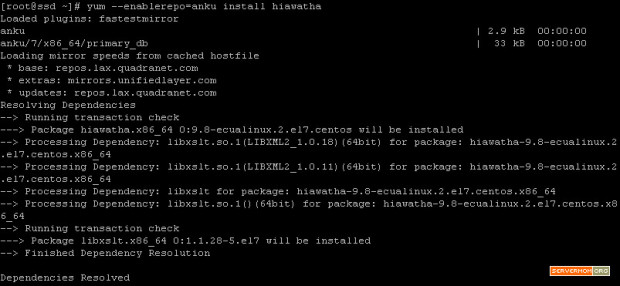
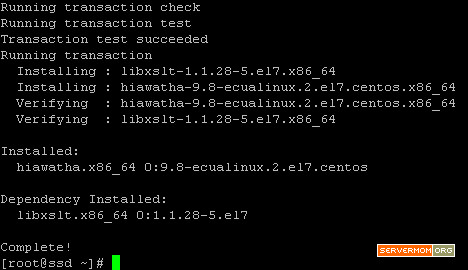
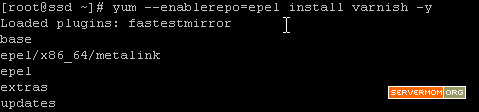
Step 3 – Now you can install Varnish Cache v4 via Yum by enabling the newly installed repo:

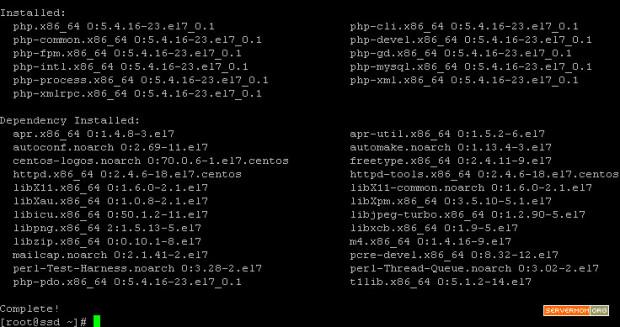
yum --enablerepo=epel install varnish -y

varnish-install

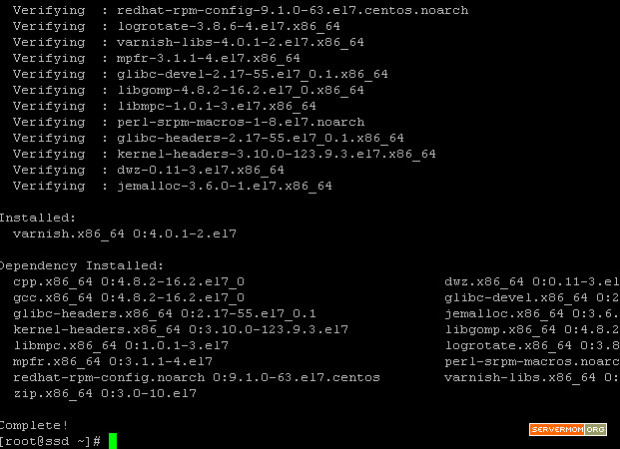
and once the process finished, your screen will look like similar to this:

varnish-install-2

You can check which version is recently installed using simple command below:

varnishd -V

In my example it is Varnish version 4.0.1

varnish-version-4

How to Setup Varnish 4 for Apache

Alright, so now you have Varnish 4 installed and ready to accelerate your website hosted on your LAMP CentOS 7 VPS. Before running it for the very first time, you have to firstly configure Varnish Cache making it works with Apache web server. Previously, Varnish configuration file was located in “/etc/sysconfig/varnish” but since Varnish 4.0 this has changed.

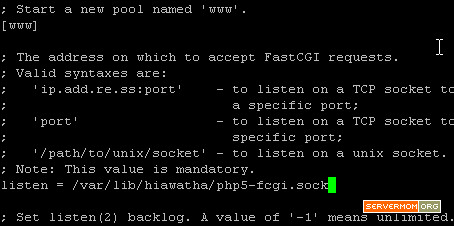
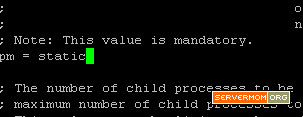
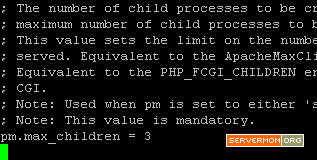
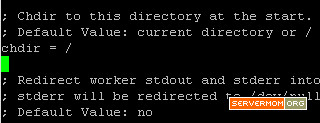
Step 1 – Use your favorite editor to edit varnish.params file. In this case I use Nano editor:

nano /etc/varnish/varnish.params

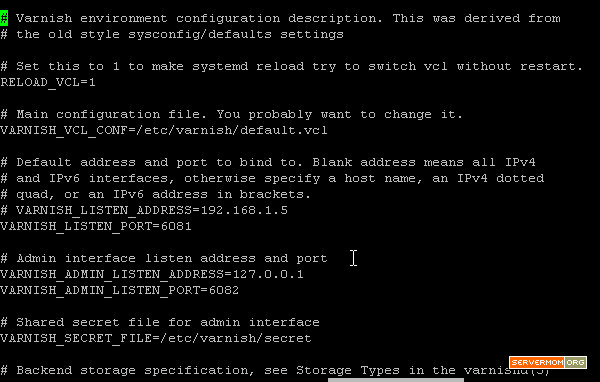
The first part of the config file looks like this:

varnish-main-config

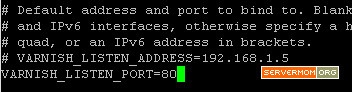
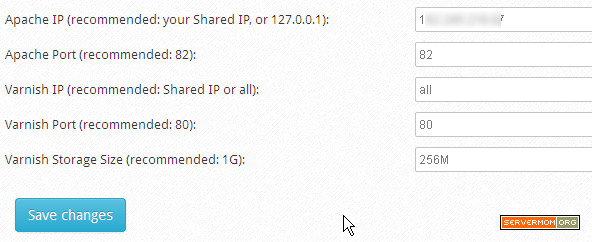
Step 2 – Change Listen Port to 80 as we are going to run Varnish in front of Apache:

varnish-params-port

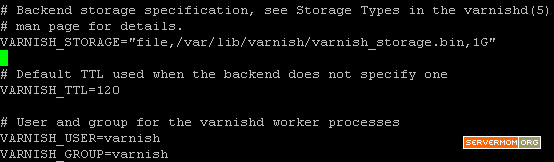
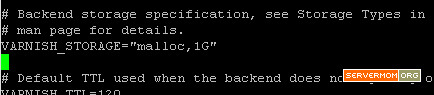
Step 3 – Scroll down the page a little bit and look at VARNISH_STORAGE= line. Default value means Varnish will use your server’s Disk to store all cached files. You can leave it as it is if your VPS rides a fast SSD disk (like RamNode) – or if you build a dedicated Varnish server to store big cached files.

varnish-params-storage

But if you want faster experience, using RAM-based caching can be done by replacing the file part with malloc. Example below allows Varnish to use 1GB of RAM as cache storage:

varnish-params-malloc

And this to use 256MB of RAM:

varnish-params-malloc-256

Once done editing, Save changes and exit the editor (in Nano it is Control+O then Control+X).

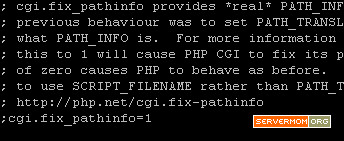
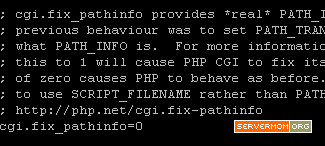
Step 4 – Next, configure default Varnish VCL file located in /etc/varnish/. That VCL file holds configuration to tell varnish where to look for the webserver content (in this case is to fetch from Apache in another port like 8080). Use Nano editor to edit it:

nano /etc/varnish/default.vcl

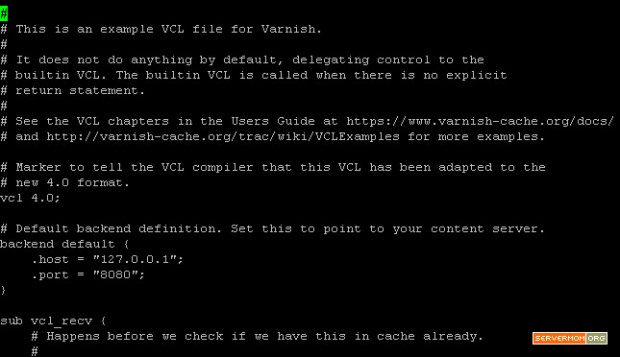
Your default view should look like this:

varnish-default-vcl

As you can see, it is already pre-configured to fetch content from webserver (Apache) running on port 8080. So you don’t have to change it. One thing you may also notice is that the other three sections (sub vcl_recv, sub vcl_backend_response and sub vcl_deliver) still have no entries. You can leave it as it is for a while now (I’ll explain later). Now exit the editor.

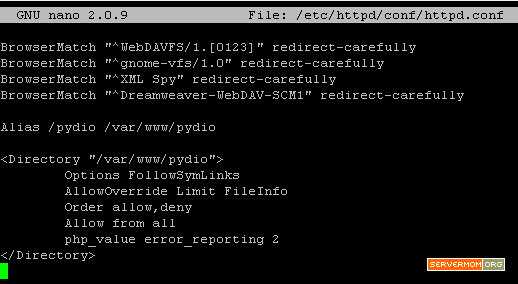
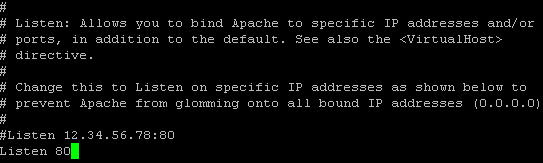
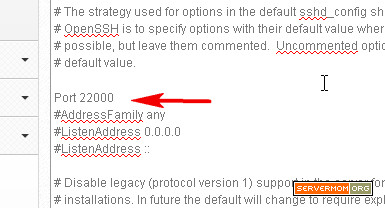
Step 5 – Now edit Apache configuration file:

nano /etc/httpd/conf/httpd.conf

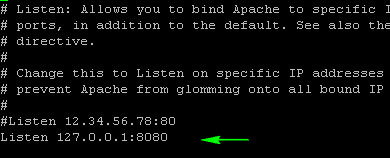
Then look for the line that says “Listen 80″ and change it to 127.0.0.1:8080:

so it will look like this:

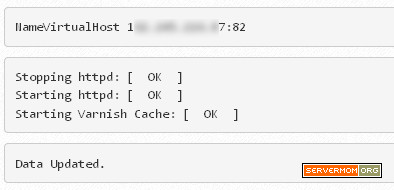
Step 6 – Next, if you have already created a Virtual Hosts before, make sure to change its listening port from 80 to 8080

httpd-8080-varnish

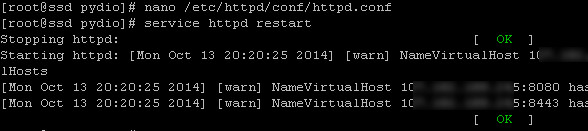
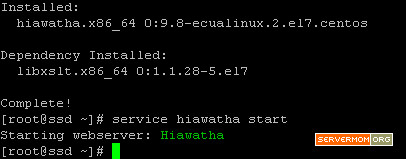
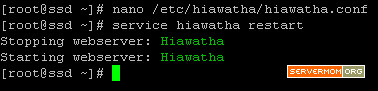
Step 7 – Now restart Apache at first so the webserver run on port 8080 leaving port 80 being usable by Varnish:

systemctl restart httpd.service

then start Varnish for the very first time:

systemctl restart varnish.service

restart-httpd-varnish

You may also need to enable varnish to automatically run each time your server reboot:

systemctl enable varnish.service

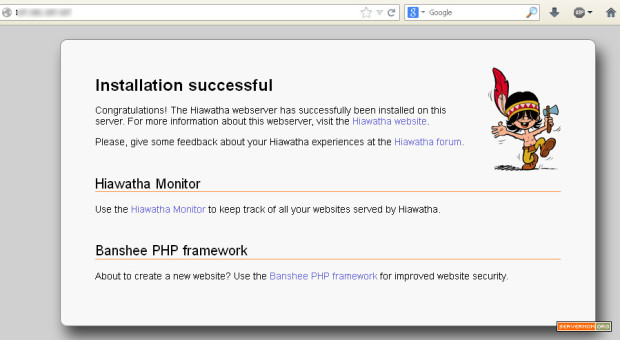
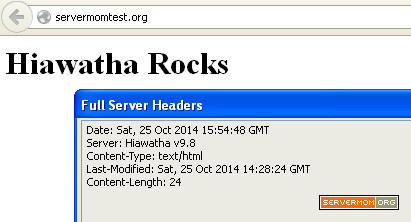
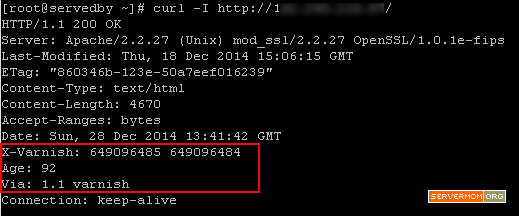
That’s it. Now you can give it a test. Open it on your browser and your website should now be loaded via Varnish v4.

varnish-4-success

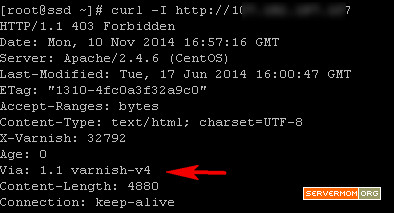
You can check it directly in command line using simple curl command to fetch its header response:

curl -I http://domain-or-ipaddress

varnish-header

Advanced Varnish 4 Configuration Tweak

As what I told you before that default .vcl file has no configuration defined except the backend section. However you can tune Varnish to behave as you may need. There are many syntax and templates you can use but if you want a shortcut, you can try this one by mattiasgeniar or this one for Drupal by sklav.

example for default.vcl file tuned for general dynamic website:

vcl 4.0;
# Based on: https://github.com/mattiasgeniar/varnish-4.0-configuration-templates/blob/master/default.vcl
# Corrected & improved for 4.0.2 by jnerin@gmail.com
import std; 
import directors;
backend server1 { # Define one backend
	.host = "127.0.0.1"; # IP or Hostname of backend
	.port = "8080"; # Port Apache or whatever is listening
	.max_connections = 300; # That's it
	.probe = {
		#.url = "/"; # short easy way (GET /)
		# We prefer to only do a HEAD /
		.request = 
			"HEAD / HTTP/1.1"
			"Host: localhost"
			"Connection: close";      	
		.interval = 5s; # check the health of each backend every 5 seconds
		.timeout = 1s; # timing out after 1 second.
		# If 3 out of the last 5 polls succeeded the backend is considered healthy, otherwise it will be marked as sick
		.window = 5;
		.threshold = 3;
		}
	.first_byte_timeout     = 300s;   # How long to wait before we receive a first byte from our backend?
	.connect_timeout        = 5s;     # How long to wait for a backend connection?
	.between_bytes_timeout  = 2s;     # How long to wait between bytes received from our backend?
}
acl purge {
# ACL we'll use later to allow purges
	"localhost";
	"127.0.0.1";
	"::1";
}

/*
acl editors {
# ACL to honor the "Cache-Control: no-cache" header to force a refresh but only from selected IPs
	"localhost";
	"127.0.0.1";
	"::1";	
}
*/

sub vcl_init {
# Called when VCL is loaded, before any requests pass through it. Typically used to initialize VMODs.

	new vdir = directors.round_robin();
	vdir.add_backend(server1);
	# vdir.add_backend(server...);
	# vdir.add_backend(servern);
}

sub vcl_recv {
# Called at the beginning of a request, after the complete request has been received and parsed. Its purpose is to decide whether or not to serve the request, how to do it, and, if applicable, which backend to use.
# also used to modify the request

	set req.backend_hint = vdir.backend(); # send all traffic to the vdir director

	if (req.restarts == 0) {
		if (req.http.X-Forwarded-For) { # set or append the client.ip to X-Forwarded-For header
			set req.http.X-Forwarded-For = req.http.X-Forwarded-For + ", " + client.ip;
		} else {
			set req.http.X-Forwarded-For = client.ip;
		}
	}

	# Normalize the header, remove the port (in case you're testing this on various TCP ports)
	set req.http.Host = regsub(req.http.Host, ":[0-9]+", "");
	
	# Normalize the query arguments
	set req.url = std.querysort(req.url);

	# Allow purging
	if (req.method == "PURGE") {
		if (!client.ip ~ purge) { # purge is the ACL defined at the begining
			# Not from an allowed IP? Then die with an error.
			return (synth(405, "This IP is not allowed to send PURGE requests."));
		}
		# If you got this stage (and didn't error out above), purge the cached result
		return (purge);
	}

	# Only deal with "normal" types
	if (req.method != "GET" &&
			req.method != "HEAD" &&
			req.method != "PUT" &&
			req.method != "POST" &&
			req.method != "TRACE" &&
			req.method != "OPTIONS" &&
			req.method != "PATCH" &&
			req.method != "DELETE") {
		/* Non-RFC2616 or CONNECT which is weird. */
		return (pipe);
	}

	# Implementing websocket support (https://www.varnish-cache.org/docs/4.0/users-guide/vcl-example-websockets.html)
	if (req.http.Upgrade ~ "(?i)websocket") {
        	return (pipe);
     	}

	# Only cache GET or HEAD requests. This makes sure the POST requests are always passed.
	if (req.method != "GET" && req.method != "HEAD") {
		return (pass);
	}

	# Some generic URL manipulation, useful for all templates that follow
	# First remove the Google Analytics added parameters, useless for our backend
	if (req.url ~ "(\?|&)(utm_source|utm_medium|utm_campaign|utm_content|gclid|cx|ie|cof|siteurl)=") {
		set req.url = regsuball(req.url, "&(utm_source|utm_medium|utm_campaign|utm_content|gclid|cx|ie|cof|siteurl)=([A-z0-9_\-\.%25]+)", "");
		set req.url = regsuball(req.url, "\?(utm_source|utm_medium|utm_campaign|utm_content|gclid|cx|ie|cof|siteurl)=([A-z0-9_\-\.%25]+)", "?");
		set req.url = regsub(req.url, "\?&", "?");
		set req.url = regsub(req.url, "\?$", "");
	}

	# Strip hash, server doesn't need it.
	if (req.url ~ "\#") {
		set req.url = regsub(req.url, "\#.*$", "");
	}

	# Strip a trailing ? if it exists
	if (req.url ~ "\?$") {
		set req.url = regsub(req.url, "\?$", "");
	}

	# Some generic cookie manipulation, useful for all templates that follow
	# Remove the "has_js" cookie
	set req.http.Cookie = regsuball(req.http.Cookie, "has_js=[^;]+(; )?", "");

	# Remove any Google Analytics based cookies
	set req.http.Cookie = regsuball(req.http.Cookie, "__utm.=[^;]+(; )?", "");
	set req.http.Cookie = regsuball(req.http.Cookie, "_ga=[^;]+(; )?", "");
	set req.http.Cookie = regsuball(req.http.Cookie, "utmctr=[^;]+(; )?", "");
	set req.http.Cookie = regsuball(req.http.Cookie, "utmcmd.=[^;]+(; )?", "");
	set req.http.Cookie = regsuball(req.http.Cookie, "utmccn.=[^;]+(; )?", "");

	# Remove the Quant Capital cookies (added by some plugin, all __qca)
	set req.http.Cookie = regsuball(req.http.Cookie, "__qc.=[^;]+(; )?", "");

	# Remove the AddThis cookies
	set req.http.Cookie = regsuball(req.http.Cookie, "__atuvc=[^;]+(; )?", "");

	# Remove a ";" prefix in the cookie if present
	set req.http.Cookie = regsuball(req.http.Cookie, "^;\s*", "");

	# Are there cookies left with only spaces or that are empty?
	if (req.http.cookie ~ "^\s*$") {
		unset req.http.cookie;
	}

	# Normalize Accept-Encoding header
	# straight from the manual: https://www.varnish-cache.org/docs/3.0/tutorial/vary.html
	# TODO: Test if it's still needed, Varnish 4 now does this by itself if http_gzip_support = on
	# https://www.varnish-cache.org/docs/trunk/users-guide/compression.html
	# https://www.varnish-cache.org/docs/trunk/phk/gzip.html
	if (req.http.Accept-Encoding) {
		if (req.url ~ "\.(jpg|png|gif|gz|tgz|bz2|tbz|mp3|ogg)$") {
			# No point in compressing these
			unset req.http.Accept-Encoding;
		} elsif (req.http.Accept-Encoding ~ "gzip") {
			set req.http.Accept-Encoding = "gzip";
		} elsif (req.http.Accept-Encoding ~ "deflate") {
			set req.http.Accept-Encoding = "deflate";
		} else {
			# unkown algorithm
			unset req.http.Accept-Encoding;
		}
	}

	if (req.http.Cache-Control ~ "(?i)no-cache") { 
	#if (req.http.Cache-Control ~ "(?i)no-cache" && client.ip ~ editors) { # create the acl editors if you want to restrict the Ctrl-F5
	# http://varnish.projects.linpro.no/wiki/VCLExampleEnableForceRefresh
	# Ignore requests via proxy caches and badly behaved crawlers
	# like msnbot that send no-cache with every request.
		if (! (req.http.Via || req.http.User-Agent ~ "(?i)bot" || req.http.X-Purge)) {
			#set req.hash_always_miss = true; # Doesn't seems to refresh the object in the cache
			return(purge); # Couple this with restart in vcl_purge and X-Purge header to avoid loops
		}
	}

	# Large static files are delivered directly to the end-user without
	# waiting for Varnish to fully read the file first.
	# Varnish 4 fully supports Streaming, so set do_stream in vcl_backend_response()
	if (req.url ~ "^[^?]*\.(mp[34]|rar|tar|tgz|gz|wav|zip|bz2|xz|7z|avi|mov|ogm|mpe?g|mk[av])(\?.*)?$") {
		unset req.http.Cookie;
		return (hash);
	}

	# Remove all cookies for static files
	# A valid discussion could be held on this line: do you really need to cache static files that don't cause load? Only if you have memory left.
	# Sure, there's disk I/O, but chances are your OS will already have these files in their buffers (thus memory).
	# Before you blindly enable this, have a read here: http://mattiasgeniar.be/2012/11/28/stop-caching-static-files/
	if (req.url ~ "^[^?]*\.(bmp|bz2|css|doc|eot|flv|gif|gz|ico|jpeg|jpg|js|less|pdf|png|rtf|swf|txt|woff|xml)(\?.*)?$") {
		unset req.http.Cookie;
		return (hash);
	}

	# Send Surrogate-Capability headers to announce ESI support to backend
	set req.http.Surrogate-Capability = "key=ESI/1.0";

	if (req.http.Authorization) {
		# Not cacheable by default
		return (pass);
	}

	return (hash);
}

sub vcl_pipe {
# Called upon entering pipe mode. In this mode, the request is passed on to the backend, and any further data from both the client and backend is passed on unaltered until either end closes the connection. Basically, Varnish will degrade into a simple TCP proxy, shuffling bytes back and forth. For a connection in pipe mode, no other VCL subroutine will ever get called after vcl_pipe.

	# Note that only the first request to the backend will have
	# X-Forwarded-For set.  If you use X-Forwarded-For and want to
	# have it set for all requests, make sure to have:
	# set bereq.http.connection = "close";
	# here.  It is not set by default as it might break some broken web
	# applications, like IIS with NTLM authentication.

	#set bereq.http.Connection = "Close";

	# Implementing websocket support (https://www.varnish-cache.org/docs/4.0/users-guide/vcl-example-websockets.html)
     	if (req.http.upgrade) {
        	set bereq.http.upgrade = req.http.upgrade;
     	}

	return (pipe);
}

sub vcl_pass {
# Called upon entering pass mode. In this mode, the request is passed on to the backend, and the backend's response is passed on to the client, but is not entered into the cache. Subsequent requests submitted over the same client connection are handled normally.

	# return (pass);
}

# The data on which the hashing will take place
sub vcl_hash {
# Called after vcl_recv to create a hash value for the request. This is used as a key to look up the object in Varnish.

	hash_data(req.url);

	if (req.http.host) {
		hash_data(req.http.host);
	} else {
		hash_data(server.ip);
	}

	# hash cookies for requests that have them
	if (req.http.Cookie) {
		hash_data(req.http.Cookie);
	}
}

sub vcl_hit {
# Called when a cache lookup is successful.

	if (obj.ttl >= 0s) {
		# A pure unadultered hit, deliver it
		return (deliver);
	}

	# https://www.varnish-cache.org/docs/trunk/users-guide/vcl-grace.html
	# When several clients are requesting the same page Varnish will send one request to the backend and place the others on hold while fetching one copy from the backend. In some products this is called request coalescing and Varnish does this automatically.
	# If you are serving thousands of hits per second the queue of waiting requests can get huge. There are two potential problems - one is a thundering herd problem - suddenly releasing a thousand threads to serve content might send the load sky high. Secondly - nobody likes to wait. To deal with this we can instruct Varnish to keep the objects in cache beyond their TTL and to serve the waiting requests somewhat stale content.

#	if (!std.healthy(req.backend_hint) && (obj.ttl + obj.grace > 0s)) {
#		return (deliver);
#	} else {
#		return (fetch);
#	}

	# We have no fresh fish. Lets look at the stale ones.
	if (std.healthy(req.backend_hint)) {
		# Backend is healthy. Limit age to 10s.
	    	if (obj.ttl + 10s > 0s) {
      			#set req.http.grace = "normal(limited)";
      			return (deliver);
	    	} else {
      			# No candidate for grace. Fetch a fresh object.
			return(fetch);
	   	}
	} else {
		# backend is sick - use full grace
    		if (obj.ttl + obj.grace > 0s) {
      			#set req.http.grace = "full";
			return (deliver);
		} else {
			# no graced object.
			return (fetch);
		}
	}


	# fetch & deliver once we get the result
	return (fetch);	# Dead code, keep as a safeguard
}

sub vcl_miss {
# Called after a cache lookup if the requested document was not found in the cache. Its purpose is to decide whether or not to attempt to retrieve the document from the backend, and which backend to use.

	return (fetch);
}

# Handle the HTTP request coming from our backend
sub vcl_backend_response {
# Called after the response headers has been successfully retrieved from the backend.

	# Pause ESI request and remove Surrogate-Control header
	if (beresp.http.Surrogate-Control ~ "ESI/1.0") {
		unset beresp.http.Surrogate-Control;
		set beresp.do_esi = true;
	}

	# Enable cache for all static files
	# The same argument as the static caches from above: monitor your cache size, if you get data nuked out of it, consider giving up the static file cache.
	# Before you blindly enable this, have a read here: http://mattiasgeniar.be/2012/11/28/stop-caching-static-files/
	if (bereq.url ~ "^[^?]*\.(bmp|bz2|css|doc|eot|flv|gif|gz|ico|jpeg|jpg|js|less|mp[34]|pdf|png|rar|rtf|swf|tar|tgz|txt|wav|woff|xml|zip)(\?.*)?$") {
		unset beresp.http.set-cookie;
	}


	# Large static files are delivered directly to the end-user without
	# waiting for Varnish to fully read the file first.
	# Varnish 4 fully supports Streaming, so use streaming here to avoid locking.
	if (bereq.url ~ "^[^?]*\.(mp[34]|rar|tar|tgz|gz|wav|zip|bz2|xz|7z|avi|mov|ogm|mpe?g|mk[av])(\?.*)?$") {
		unset beresp.http.set-cookie;		
		set beresp.do_stream = true; 	# Check memory usage it'll grow in fetch_chunksize blocks (128k by default) if 
						# the backend doesn't send a Content-Length header, so only enable it for big objects
		set beresp.do_gzip = false;	# Don't try to compress it for storage
	}

	# Sometimes, a 301 or 302 redirect formed via Apache's mod_rewrite can mess with the HTTP port that is being passed along.
	# This often happens with simple rewrite rules in a scenario where Varnish runs on :80 and Apache on :8080 on the same box.
	# A redirect can then often redirect the end-user to a URL on :8080, where it should be :80.
	# This may need finetuning on your setup.
	#
	# To prevent accidental replace, we only filter the 301/302 redirects for now.
	if (beresp.status == 301 || beresp.status == 302) {
		set beresp.http.Location = regsub(beresp.http.Location, ":[0-9]+", "");
	}

	# Set 2min cache if unset for static files
	if (beresp.ttl <= 0s || beresp.http.Set-Cookie || beresp.http.Vary == "*") {
		set beresp.ttl = 120s; # Important, you shouldn't rely on this, SET YOUR HEADERS in the backend
		set beresp.uncacheable = true;
		return (deliver);
	}

	# Allow stale content, in case the backend goes down.
	# make Varnish keep all objects for 6 hours beyond their TTL
	set beresp.grace = 6h;

	return (deliver);
}

# The routine when we deliver the HTTP request to the user
# Last chance to modify headers that are sent to the client
sub vcl_deliver {
# Called before a cached object is delivered to the client.

	if (obj.hits > 0) { # Add debug header to see if it's a HIT/MISS and the number of hits, disable when not needed
		set resp.http.X-Cache = "HIT";
	} else {
		set resp.http.X-Cache = "MISS";
	}
	# Please note that obj.hits behaviour changed in 4.0, now it counts per objecthead, not per object
	# and obj.hits may not be reset in some cases where bans are in use. See bug 1492 for details.
	# So take hits with a grain of salt
	set resp.http.X-Cache-Hits = obj.hits;

	# Remove some headers: PHP version
	unset resp.http.X-Powered-By;

	# Remove some headers: Apache version & OS
	unset resp.http.Server;
	unset resp.http.X-Drupal-Cache;
	unset resp.http.X-Varnish;
	unset resp.http.Via;
	unset resp.http.Link;

	return (deliver);
}

sub vcl_purge {
    # restart request
    set req.http.X-Purge = "Yes";
    return(restart);
}

sub vcl_synth {
	if (resp.status == 720) {
		# We use this special error status 720 to force redirects with 301 (permanent) redirects
		# To use this, call the following from anywhere in vcl_recv: error 720 "http://host/new.html"
		set resp.status = 301;
		set resp.http.Location = resp.reason;
		return (deliver);
	} elseif (resp.status == 721) {
		# And we use error status 721 to force redirects with a 302 (temporary) redirect
		# To use this, call the following from anywhere in vcl_recv: error 720 "http://host/new.html"
		set resp.status = 302;
		set resp.http.Location = resp.reason;
		return (deliver);
	}

	return (deliver);
}


sub vcl_fini {
# Called when VCL is discarded only after all requests have exited the VCL. Typically used to clean up VMODs.

	return (ok);
}

This post Install Varnish 4 To Run With LAMP on CentOS 7 is part of ServerMom.

How to Install CentOS Web Panel (CWP)

$
0
0

Another great free hosting control panel to install on your VPS, meet CentOS Web Panel. I believe this free control panel will compete greatly with zPanel and Vesta CP to gain more user attention. One thing of it makes me more interested is that CWP will install full LAMP stack plus Varnish Cache server while zPanel can only install LAMP and Vesta CP can install LAMP with Nginx as reverse proxy.

Using a hosting control panel can save times for you to install all necessary software to build a full working web hosting server including needed webserver (Apache, Nginx), mail server, DNS server MySQL database server and FTP server. Installing all those software manually one by one will consume much time with great chance to fail.

Varnish Cache is a great caching platform to store hot cached content of your web pages in RAM. That way it can reduce request to hit backend server hence speeding up your website and reduce CPU load in the same time. Again, installing and setting up Varnish is not really a piece of cake for a newbie.

About CWP

CWP is -again- a free web hosting control panel designed for newbie who want to build a working hosting server easily and to take control or manage his/her server all in an intuitive web interface without having to open any SSH console. CWP is really considered feature-rich. Some of notable features including:

– Apache Web Server (Mod Security + OWASP rules optional)
– PHP 5.4 (suPHP, SuExec + PHP version switcher)
– MySQL + phpMyAdmin
– Postfix + Dovecot + roundcube webmail (Antivirus, Spamassassin optional)
– CSF Firewall
– File System Lock (no more website hacking, all your files are locked from changes)
– Backups (optional)
– AutoFixer for server configuration
– Varnish Cache server (improve your server performances by 3x)
– Compiles Apache from source (improves up to 15% on performances)
– Apache reCompiler + Additional modules install with one click
– Apache server status, configuration
– Edit apache vhosts, vhosts templates, include configuration
– Rebuild all apache Virtual hosts with one click
– suPHP & suExec (improved security)
– Mod Security + OWASP rules (one click install, easy management)
– Tomcat 8 server management & install in one click
– DoS protection from the Slow-Loris attacks
– Compiles PHP from source (improves up to 20% on performances)
– PHP switcher (switch between PHP versions like: 5.2, 5.3, 5.4, 5.5)
– Simple php editor
– PHP addons with one click
– PHP.ini editor & PHP info & List modules
– php.ini per user account (you can add changes in /home/USER/php.ini)
– postfix & dovecot
– MailBoxes, Alias
– Roundcube webmail
– Postfix Mail queue
– rDNS Checker Module (check you rDNS records)
– AntiSPAM (Spamhaus cronjob)
– Re-Build Postfix/Dovecot Mail server with (AntiVirus, AntiSpam Protection)
– Email Auto Responder
– MySQL Database Managment
– Add local or remote access user
– Live Monitor MySQL process list

Requirements

  1. A server / VPS running CentOS 6 (at the time of writing it still does not support CentOS 7). Clean minimal install is recommended. Need recommendation? try RamNode or DigitalOcean.
  2. Basic knowledge about most common Unix command to manage a Linux VPS.
  3. Any favorite SSH client like Putty or simply Terminal if you’re using Linux or Mac.
  4. Make sure your VPS is running CentOS 6 with no LAMP component installed (Apache, MySQL, PHP)
  5. About 15 minutes of your time and may be a cup of coffee or tea.

How to Install CWP

Follow steps below to setup CentOS Web Panel on your VPS:

Step 1 – Login to your server as root or as user with sudo privilege:

cwp-root

Step 2 – Go to /usr/local/src directory and download CWP installer package there:

cd /usr/local/src
wget http://centos-webpanel.com/cwp-latest

cwp-download

Step 3 – Once downloaded, issue one simple command below to start the installer:

sh cwp-latest

It will start by firstly check whether Apache or MySQL is installed and running. After that, you may simply wait the process till it done. The whole process should be automatic so just sit tight, wait and drink your coffee.

cwp-install-process

The CWP installation progress will take some times because several software will be compiled from source (especially PHP) for improved performance, security and flexibility. In my case it is almost like installing WHM/cPanel.Once the process is done, you’ll see something like this:

cwp-installed

Do not forget to note down the information displayed on screen.

Step 4 – Now hit Enter on your keyboard and your server should reboot automatically. Next time you try to login to your server via SSH, the display will be different. You will now see CWP welcome message.

cwp-ssh

Step 5 – Open up your favorite web browser (Firefox, Chrome, etc) and open your newly installed CWP admin GUI at one of these URLs:

http://your-ip-address:2030orhttps://your-ip-address:2031

You can use https:// in case if you want to login to your CWP server in middle of unsecure area like public Wifi. Otherwise http:// is much more faster to access.

cwp-login-page

CWP use “root” as default Administrator username and the same password you use to login to your server via SSH as root.

CentOS Web Panel GUI: Dashboard.

cwp-interface

CWP Resource Usage

Default installation of CWP consumes very low resource usage. Here’s example of mine:

RAM:

cwp-ram

CPU load and disk

cwp-cpu-disk

That’s considered low resource usage for a web hosting panel. Also, default installation already includes latest stable version of PHP with Zend Optimizer and ionCube PHP Loader.

cwp-php-version

That’s all for now.In the next tutorial: Basic configuration of newly installed CWP. Stay tuned!

This post How to Install CentOS Web Panel (CWP) is part of ServerMom.

Basic Configuration for CentOS Web Panel (CWP)

$
0
0

So you installed CWP and what’s next? Here it is several initial configurations for newly installed CentOS Web Panel on your server. I believe without doing these, you will not be able to host your websites on it. Read on.

First thing first, install CWP and login to CWP dashboard as root or a user with root privilege via http://your-ip:2030

1. Setup Nameservers

Name servers (NS) are often called DSN servers, every web site has two name servers to which it is pointed. Setting up NS must be done at both domain registrar and hosting account (server-end). In CWP you can define your default NS by going to DNS Functions >> Edit Nameservers IPs. Enter your desired Nameservers and put your server’s IP next to each followed by clicking Save Changes button. See illustration below:

cwp-edit-ns

Once done, you’ll see this message:

cwp-edit-ns-done

2. Setup Shared IP

This is very needed. However if you forgot this step then you’ll not be able to host your websites on your server. Yet, even you typed your VPS IP on browser, it will load nothing / inaccessible. This step is also necessary if you have two or more free IPs on your sever so you can define any specific IP of your server to use with ant other users (think as Shared hosting).

Go to CWP Settings then Edit Settings.

Enter your current server IP or free unused IP. Leave Apache port to 80 by default because we don’t have Varnish activated yet. Do not forget to enter your valid email address in the Root Email field.

cwp-shared-ip

After clicking the Save Changes button, you’ll see a message similar to this:

cwp-shared-ip-done

3. Setup A Hosting Package

A hosting package is basically just like a web hosting plan you see in many providers. A hosting package contains limitations to resources like Disk space, Bandwidth quota, number of domains / subdomains allowed, etc. Still in CWP, go to Packages and Add a Package. Next, give that package a name and define several limitations followed by clicking the Create button.:

cwp-package

Once done, you’ll just see a message saying Data Updated!

4. Create a User Account

Think your root user (admin) is an account to access WHM so it has ability manage all cPanel accounts (user). Now, create a user account for your own. You’ll use that user to add your domains /websites on your hosting server. Go to User Accounts menu then click New Account. Fill in all necessary fields and options.

cwp-create-account

Enter your main domain in the Domain field. You may change other options or simply leave as it is (default). Once done, click the Create button. In the next page, you’ll see a custom Virtual Hosts file generated for that domain followed by account details.

That’s it. Now each time you want to add new website as new domain or addon domain, you can choose whether to create new account or simply use your newly created account.

5. Install Softaculous

This is optional but I believe you and your users may need it. Softaculous, a one-clik script installer. You can install this popular script installer software in CWP with only one click-away. Just go to Script Installer > Script Manager > then click the Install Softaculous button.

cwp-softaculous

You’ll then see this message:

Installing Softaculous in background (check back in 5-10 minutes if softaculous is installed, log file: /var/log/softaculous-installer.log)
If the installation fails, you can try to install it manually using command: /usr/local/src/install.sh --quick

If you refresh your browser and the installation is done, you may notice new menu added in the bottom left corner:

cwp-softaculous-menu

That’s all what I think few basic configs for newly installed CWP. Any suggestion? Do not hesitate to tip me.

This post Basic Configuration for CentOS Web Panel (CWP) is part of ServerMom.

How to Activate Varnish Cache Server on CWP

$
0
0

What interested me from CWP is that the software comes with LAMP plus Varnish, a powerful reputable frontend caching engine to boost your website loading speed and reduce server’s CPU load. User can choose either Disk-based or RAM-based caching mechanism. However if your server / VPS has a generous amount of RAM, you can allocate part of it for Varnish to store its cache files. RAM-based caching is however faster than Disk, even an SSD.

During initial install, CWP will only install and enable full LAMP stack while Varnish need is not. Hence, you’ll need additional steps to get it installed, activated and configured properly. But do not worry so much because installing Varnish on CentOS Web Panel can be done in one click (unlike zPanel that you have to install it manually).

Are you ready? Here’s what you’ll need for:

  1. First, install CWP on your server following my previous guide.
  2. Do some basic configuration tasks.
  3. Login to CWP admin page as root or as user with root privilege via:
    http://ip-address:2030

Next, follow these steps to install and configure Varnish on CentOS Web Panel:

Step 1 – Go to Apache Settings then Varnish Cache Server.

cwp-varnish

Step 2 – You’ll then see a message saying that Varnish is not installed (yet). Now click on the blue Install Varnish button.

cwp-install-varnish

In the next page, you can see all the install process like following:

Preparing...                ##################################################
varnish-release             ##################################################
Loaded plugins: fastestmirror
Loading mirror speeds from cached hostfile
 * base: repos.mia.quadranet.com
 * extras: repos.mia.quadranet.com
 * rpmforge: mirror.teklinks.com
 * updates: repos.mia.quadranet.com
Setting up Install Process
Resolving Dependencies
--> Running transaction check
---> Package varnish.x86_64 0:3.0.6-1.el6 will be installed
--> Processing Dependency: varnish-libs = 3.0.6-1.el6 for package: varnish-3.0.6-1.el6.x86_64
--> Processing Dependency: libvarnishapi.so.1(LIBVARNISHAPI_1.0)(64bit) for package: varnish-3.0.6-1.el6.x86_64
--> Processing Dependency: libvarnishapi.so.1()(64bit) for package: varnish-3.0.6-1.el6.x86_64
--> Running transaction check
---> Package varnish-libs.x86_64 0:3.0.6-1.el6 will be installed
--> Finished Dependency Resolution

Dependencies Resolved

================================================================================
 Package             Arch          Version             Repository          Size
================================================================================
Installing:
 varnish             x86_64        3.0.6-1.el6         varnish-3.0        444 k
Installing for dependencies:
 varnish-libs        x86_64        3.0.6-1.el6         varnish-3.0         42 k

Transaction Summary
================================================================================
Install       2 Package(s)

Total download size: 485 k
Installed size: 1.2 M
Downloading Packages:
--------------------------------------------------------------------------------
Total                                           215 kB/s | 485 kB     00:02     
Running rpm_check_debug
Running Transaction Test
Transaction Test Succeeded
Running Transaction

  Installing : varnish-libs-3.0.6-1.el6.x86_64                              1/2 

  Installing : varnish-3.0.6-1.el6.x86_64                                   2/2 

  Verifying  : varnish-3.0.6-1.el6.x86_64                                   1/2 

  Verifying  : varnish-libs-3.0.6-1.el6.x86_64                              2/2 

Installed:
  varnish.x86_64 0:3.0.6-1.el6                                                  

Dependency Installed:
  varnish-libs.x86_64 0:3.0.6-1.el6                                             

Complete!

Step 3 – It is time to setup few configuration so Varnish can run properly. By default, the configuration is set as following:

Varnish port is set to: 6081 in: /etc/sysconfig/varnish
Apache IP is set to 127.0.0.1 in Varnish config file: /etc/varnish/default.vcl
Apache port is set to 80 in Varnish config file: /etc/varnish/default.vcl

Normally as per my previous guide, if you installed it manually then you have to edit each of Varnish configuration including its .vcl files. Thanks to CWP, you can now configure it via a web-based user interface so you don’t even need to open Putty and do the task via command line interface.

Now scroll down that page a little bit and you will see a form where you can adjust its value.

cwp-varnish-config

Simply edit as recommended except the Varnish Storage Size because you need to adjust the value according the your server’s RAM. If your VPS has only 1GB of RAM, you can allocate 512MB max for Varnish. Of course you can make it less than 512MB. In my case I will allocate 256MB.

cwp-varnish-conf-ok

Once you clicked the Save Changes button, you’ll see several lines of message like below:

cwp-varnish-done

The first part means CWP has updated all Virtual Host entries adjusting its port to 82 (Apache). The next part just tells you that Apache has restarted and Varnish is running. That’s it.

Now you can use your other server to check its header using CURL command:

varnish-meta-curl

See? Enjoy the speed of Varnish without the complicated part.

This post How to Activate Varnish Cache Server on CWP is part of ServerMom.

Basic Security Setup for CentOS Web Panel

$
0
0

CentOS Web panel or CWP comes with so many features those usually are not included in most free hosting control panel. However some part of the features is not activated / enabled hence you’ll need to firstly activate it.

We’ve previously learned how to install CWP on your CentOS server / VPS. The next essential task you have to perform is to setup some basic security practices to secure your server. This article will show you some basic steps to add basic security layer to your server running CWP on it. You may or may not follow this tutorial but I believe adding some basic protections to your server is better than not at all.

Prerequisites

A CentOS server / VPS with CWP installed on it. For that, just in case you don’t have it yet, simply follow these steps:

  1. Grab a VPS with at least 512MB of RAM (Recommendation: RamNode or Digital Ocean)
  2. Install CWP by following my previous guide.
  3. Perform some basic configuration tasks.
  4. Grab a cup of coffee or tea if you like.

How to

A. Change Default SSH Port

This task is necessary as what I explained here.

Step 1 – Login to CWP Admin page as root via:

http://server-ip-address:2030/login.php

cwp-login-as-root

Step 2 – Now go to Services Config then SSH Configuration:

cwp-ssh-config

In the next page, scroll down till you see two blue buttons. Now click the Create File Backup button.

cwp-backup-ssh

Step 3 – Once you’ve created the backup of SSH configuration, it’s time to adjust the settings. Fine the following line:

#port 22

Remove the # symbol and change the “22” (it is default port) to to any number between 1025 and 65536, For example is port 22000.

cwp-change-port-ssh-22

Now do not forget to click the Save Changes button.

B. Enable CFS Firewall

Config Server Firewall (or CSF) is a free and advanced firewall for most Linux distributions and Linux based VPS.

Step 1 – Go to Security then CSF Firewall in the left menu:

cwp-cfs-app

Step 2 – Click on the green Firewall Enable button to activate the service.


cwp-csf-enabled

In the next page you’ll see a bunch of text. Shortly, it will say this:

Running /usr/local/csf/bin/csfpost.sh
Starting lfd:[  OK  ]
csf and lfd have been enabled

Step 3 – Once activated, you can now edit few lines of CSF Configuration. Click on the Firewall Configuration button.

cwp-csf-config

Step 4 – Do not forget to create a backup file by clicking the Create File Backup button.

Step 5 – Now in the next page, you’ll see many configuration lines of the Firewall and lfd service. Now add the new SSH port you’ve defined following step above.

cwp-edit-csf-conf

Once done, click the Save Changes button.

FYI, services using each port are:

  • Port 20: FTP data transfer
  • Port 21: FTP control
  • Port 22: Secure shell (SSH)
  • Port 25: Simple mail transfer protocol (SMTP)
  • Port 53: Domain name system (DNS)
  • Port 80: Hypertext transfer protocol (HTTP)
  • Port 110: Post office protocol v3 (POP3)
  • Port 113: Authentication service/identification protocol
  • Port 123: Network time protocol (NTP)
  • Port 143: Internet message access protocol (IMAP)
  • Port 443: Hypertext transfer protocol over SSL/TLS (HTTPS)
  • Port 465: URL Rendesvous Directory for SSM (Cisco)
  • Port 587: E-mail message submission (SMTP)
  • Port 993: Internet message access protocol over SSL (IMAPS)
  • Port 995: Post office protocol 3 over TLS/SSL (POP3S)
  • Port 2030: CWP login page (non SSL)
  • Port 2031: CWP login page (SSL)

p.s: Some additional settings you may also adjust:

ICMP_IN Setting ICMP_IN to 1 allows ping to your server and 0 refuses are such requests. If you are hosting any public services, it is recommended to allow ICMP requests, as these can be used to determine whether or not your service is available.

ICMP_IN_LIMIT Sets the number of ICMP (ping) requests allowed from one IP address within a specified amount of time. There is usually no need to change the default value (1/s)

DENY_IP_LIMIT Sets the number of blocked IP addresses CSF keeps track of. It is recommended to limit the number of denied IP addresses as having too many blocks may slow down the server performance.

DENY_TEMP_IP_LIMIT Same as above, but for temporary IP address blocks.

PACKET_FILTER Filter invalid, unwanted and illegal packets.

SYNFLOOD, SUNFLOOD_RATE and SYNFLOOD_BURST This offers protection against SYN flood attacks. This slows down the initialization of every connection, so you should enable this only if you know that your server is under attack.

PORTFLOOD Limits the number of connections per time interval that new connections can be made to specific ports.

CONNLIMIT Limits the number of concurrent active connections on port.

C. Setup Mod Security

Mod Security is basically a software acts as web application firewall. Generally saying, Mod_security is an apache module that helps to protect your website from various attacks by blocking commonly known exploits by using of regular expressions and rule sets. Known as a “Swiss Army Knife” of WAFs, it is open source and free to use. Yet, it is also necessary to install. Know more about mod_security here.

Step 1 – Go to Security then Mod Security menu:

cwp-mod-security

Step 2 – By default this module is not yet installed or activated so you have to firstly install it by clicking the green button:

cwp-install-mod-security

Step 3 – Once clicked, you’ll see a message that is saying “Running compiler in background… etc” which means the installation is started and still running in the background hence you’ll see that Mod Security and OSWAP modules are not installed. Wait a few minutes and refresh the page.

cwp-mdod-sec-installed

That’s it. Mod_security already includes some necessary settings by default. But however if you want to go advance, you can manually edit each configuration file and adjust the settings you want.

That’s all and thanks.

p.p.s: Have you installed CWP yet? Are you using it to host your websites? Share your experience in the comment section below.

This post Basic Security Setup for CentOS Web Panel is part of ServerMom.


Quickest Easiest Way to Install OpenVPN Server

$
0
0

Do you want to build your very own personal OpenVPN server but you have not much technical skill (and time) to build it from scratch? I previously posted how to manually install OpenVPN server on CentOS. I believe I explained all the steps as clear as possible but I notice there are still many comments asking some problems occur. Hence I also posted another tutorial to guide newbie installing OpenVPN-AS on Ubuntu but again it has few drawbacks like it has limitation in term of the number of users can use the VPN service.

So I started looking for another alternative until I found a cool OpenVPN Autoinstaller script by Nyr at GitHub. What makes me really impressed is the fact that the script only needs one line of command to execute. How cool is that?

Yet, the script will truly install and configure everything needed to build a working OpenVPN server. It also features multiple users which you can create and allow them to connect to special VPN server you’ve just built. Are you ready? Here’s what you need..

Requirements

  1. A server or VPS with at least 96MB of RAM (128MB or higher is recommended)
  2. Make sure it runs Debian-based distros (like Ubuntu)
  3. A cup of coffee and a spare time of yours

In this article I use a VPS with 96MB of RAM from BandwagonHost (the Micro-96 plan costs me $4.99 USD per year) running Debian 7 x86 Minimal template. Need recommendation? Try DigitalOcean, Ramnode or read all my recommendation here.

The Tutorial

Step 1 – Login to your VPS as root:

ovpn-1

Step 2 – Make sure the TUN/TAP module is enabled for your VPS. You can issue this command:

cat /dev/net/tun

it should return following output:

ovpn-2

other than output above, it means the TUN/TAP we are talking about is not enabled. It means you have to firstly enable it manually. If your VPS is based on OpenVZ virtualization and your VPS manager is SolusVM, you can simply see the option in SolusVM. Now login there and enable it:

ovpn-enable-tuntap

Step 3 – Now simply issue this one line of command to start installing OpenVPN automatically:

wget git.io/vpn --no-check-certificate -O openvpn-install.sh; bash openvpn-install.sh

It will then start downloading the script:

ovpn-installer-script

Step 4 – It will then ask series of questions you have to answer with -mostly- yes (y) or no (n):

ovpn-start-installer

Step 5 – Now enter the first client username which in my example I simply use client1. You can also change that to your real name but make sure it is one word only. Once done, hit Enter and wait about 2 minutes.

ovpn-installer-script-client-2

A screenshot of the process..

ovpn-installer-script-process

Step 6 – And once done, you’ll see something similar to this:

ovpn-installer-script-done

That’s it.

Connecting to OpenVPN Server

First thing first, you have to download that newly created *.ovpn file to your local computer. For that, you can simply move that file to your web directory (if you have web server installed) then download it via browser. Example of mine:

cp client1.ovpn /var/www/servermom.org/public_html/

Or, you can connect to your server either via FTP or sFTP and grab a local copy of that file. Personally I prefer to use this method so I used FileZilla and downloaded the client1.ovpn file.

download-ovpn-1

download-ovpn

Next, copy that file to default OpenVPN’s configuration folder. Usually it is Program Files > OpenVPN > config.

Now launch up OpenVPN client app (OpenVPN GUI) on your computer and try to connect to your newly created VPN server.

ovpn-connect-client-1

ovpn-connected-success

Once connected, you can launch your favorite web browser and visit either ipchicken.com or whatismyip.com and you should now see the IP of your VPS, not your real IP. Enjoy..

This post Quickest Easiest Way to Install OpenVPN Server is part of ServerMom.

Faster LEMP Stack Setup On CentOS 7 with VPSSIM

$
0
0

Nowadays, using an installer script is being popular than having to install each software one by one. I posted my previous tutorial to guide you on installing complete LNMP or LEMP stack manually either on CentOS 7 or CentOS 6. But however building a working CentOS server to host a website will be done way faster using an auto-installer script. Well, there are few scripts allow you to take a shortcut building a complete Linux, Nginx, PHP and MySQL stack. To name it a few, do you still remember Easy Engine, Ruhira’s script, and Centmin Mod?

Now meet VPSSIM (an acronym of VPS is Simple), another Nginx autoinstaller script to build full LNMP stack that works on either CentOS 6 or CentOS 7. The script is really made simple and it needs only one line of command syntax to be issued. Sounds coll already? Wait until you try it on your own.

With many functions and utilities, your VPS will have good performance, high load bearing and good security.

Key Features:

  1. Latest stable Nginx
  2. PHP-fpm with FastCGI
  3. Multiple PHP switcher: PHP 5.4, PHP 5.5 and PHP 5.6
  4. MariaDB 5.5 instead of traditional MySQL
  5. Setup SSL (https) easily
  6. Enable/disable PHPMyAdmin
  7. Optional Zend opcache
  8. Optional Memcached
  9. Optional Google Pagespeed
  10. and many more!

Prerequisites

  1. A server / VPS running either CentOS 6 or 7. Minimal template is recommended
  2. It works on either x86 or x86_64 machines.
  3. root access required
  4. a cup of coffee.

In this tutorial I use Centos 7 x86_64 minimal on 512MB VPS from Bandwagonhost. Need recommendation? Also try Digital Ocean.

How to Setup Nginx

As I said before, the installer script is made for easiness so it only needs one line of command. But first, login to your server as root.

vpssim-login

Next, simply use this single line of command and hit Enter on your keyboard:

yum -y install wget && wget https://vpssim.com/install && chmod +x install && ./install

pic:

vpssim-command-install

Now you’ll be asked to choose which PHP version you will use:

vpssim-php-choice

Type in your choice and hit Enter. Next, the script will check the specs of your system and asks you few normal questions:

vpssim-system-check-full

The answer is explainable so type in your answer and hit Enter. Now the system will ask you to double-check the information you have entered. Type y followed by hitting Enter to confirm.

vpssim-system-check-confirm

Next, the system will triple-check few settings before starting the install process. Simply press Enter to continue.

vpssim-system-check-confirm-2

And now the installation process is starting. Sit tight and wait (or drink your coffee).

vpssim-install-process

Once done, you’ll be asked to setup MySQL password for MariaDB:

vpssim-set-mysql-pass-2

Just press Enter twice, type in your new password for MySQL and retype the password once again. Now the system will finish its last step.

vpssim-done

That’s it and your system now reboots.

Now if you check your email, you’ll see something like this:

Hi!

Congratulation! You have completed installation process and configured server by VPSSIM/

This is your new server information, please read carefully, store and also keep secrets those information
Domain manager:  http://sim.servermom.org/
Link PhpMyAdmin: http://sim.servermom.org:2015/
View Zend Opcache: http://sim.servermom.org:2015/ocp.php
 All website will sotre in /home/
In order to access VPSSIM menu, you connect SSH to VPS/Server and use command line "vpssim"
Use 107.182.187.107 for sim.servermom.org if you do not point sim.servermom.org to IP VPS or use cloudflare.

 Thank you for using VPSSIM by VPSSIM.COM

!
Good luck and success.

http://VPSSIM.COM

And now if you loging as root on your server via SSH, you;ll see a greeting from VPSSIM:

vpssim-ssh

And when I checked the PHP version installed, I got this:

php-v-zend-vpssim

Wait, what’s Zend OPcache anyway? The Zend OPcache provides faster PHP execution through opcode caching and optimization. Several people say that Zend OpCache appears to be more performant than APC, more fully featured, and more reliable. The secret is that Zend OPcache improves PHP performance by storing precompiled script bytecode in the shared memory. Even rtcamp made a switch to it from APC.

Now back to your sever, in command line (SSH) type in vpssim and hit Enter so you’ll see all available menus of VPSSIM.

vpssim-menu

You can even see your server status (option #18):

vpssim-server-status

Lets try another menu. What if we try to install IonCube Loader. Choose menu number 16 then number 13.

vpssim-ioncube

Next, simply confirm it by typing y then press Enter.

That’s all. I’ll explain about how to add new website on your newly built VPSSIM server next time. Enjoy..

This post Faster LEMP Stack Setup On CentOS 7 with VPSSIM is part of ServerMom.

GHOST Vulnerability – Beware!

$
0
0

Update your glibc package now to avoid newly discovered glibc buffer over flow. Wait, what is that? According to Qualys Security Advisory CVE-2015-0235 [link], the bug is reachable both locally and remotely via the gethostbyname*() functions hence they named it as GHOST. Shortly, the vulnerability allows remote attackers to take complete control of a system by exploiting a buffer overflow bug in glibc’s GetHOST functions. Sounds horrible enough? Beware and update your VPS ASAP!

glibc-update

What kind of Linux Distro is affected by this vulnerability? Almost all popular distros including CentOS 6 & 7, Debian 7, RHEL 6 & 7, Ubuntu 10.04 & 12.04. How to patch GHOST vulnerability?

It’s simple, simply run update task.

First, login to your server root and issue this command:

On Ubuntu or Debian:

apt-get update && apt-get dist-upgrade -y

On CentOS or RHEL:

yum update glibc -y

Once done, do not forget to reboot your server. It is is necessary because the GNU C Library is used by many applications that must be restarted to use the updated library.

reboot

That’s all.

This post GHOST Vulnerability – Beware! is part of ServerMom.

10 Low End NAT IPv4 VPS Providers

$
0
0

Because NAT IPv4 VPS becomes popular lately, so I want to list few low end providers those are offering NAT IPv4 VPS plans. So what is NAT IPv4 VPS? Network Address Translation (NAT) is the process where a network device, usually a firewall, assigns a public address to a computer (or group of computers) inside a private network. So a VPS that’s utilizing this kind of technology is shortly understand-able as a VPS with shared IPv4. But however, most of them are still providing many IPv6 IPs.

Generally, the main use of NAT is to limit the number of public IP addresses an organization or company must use, for both economy and security purposes. In low end vps world, the main purpose of NATted VPS is also to make the price as low as possible. Shortly it’s just like any common VPS you usually bought it but it comes with Shared IPv4, not dedicated.

What can you use this kind of low end vps? Here it is few examples of what you can do with it:

  • Host a website on port 80 at the IPv6 or shared IPv4
  • VPN
  • Proxy (private, protected)
  • IRC client/server
  • Teamspeak server
  • Anything you want with native IPv6

Are you ready? So here is the list..

#1 – Low End Spirit

lowendspirit

Lowendspirit.com comes in my first list because it is a well-known brand providing NAT IPv4 VPS. Their parent brand is Inception Hosting which is also popular. Despite the low price they are still able to offer the great features brought by SolusVM which allows users to seamlessly reinstall, reboot, shutdown, boot, change hostname, get network information, get statistics regarding server and much more. The best part, they also employ HAProxy technology which is load balancing, round robin and HA (High availability) features are made available when users buy packages in more than one location and is configured for users by their team.

They also become popular because available locations users can select. As per now, LowEndSpirit operates node servers in Retterdam (NL), Nottingham (UK), Milan (Italy), Dallas (TX, US), Tokyo (JP), Sydney (AU), Lenoir (US), Los Angeles (US), and Dusseldorf (Germany). Lowest plan available is €3.00EUR per year offering 128MB RAM with various GB of Disk space (depends on location you choose).

#2 – i-83.net

i83

i-83.net is a privately funded VPS provider exists since 2013. The cheapest plan available is £2.50GBP for a NAT IPv4 VPS with 128MB of RAM and 5 GB HDD at Roubaix France. The best part, the plan includes free DDOS protection already.

#3 – Nano VZ

nanovz

NanoVZ.com is considered new but the provider has gained attention and trust already from their users. The company behind this outstanding service is EvoBurst Solution and in partnership with LowEndSpirit, they are now providing NAT IPv4 low end vps with lowest offer available is starting at only €1.50/Year for a plan with 64MB RAM, 1GB HDD, and /64 IPv6.

#4 – MegaVZ

megavz

MegaVZ.com is actually the “more RAM” version of NanoVZ. For every plan, they give you a /64 IPv6 Subnet (yes, that’s 18 Quintillion Addresses) and access via a Shared IPv4 Address. You will have a preconfigured SSH Port, and 20 Extra ports to use for software like Postfix, sFTP, etc. The cheapest plan offered is 4.50 € /year for a VPS with 256 MB RAM + 256 MB vSwap, 20 NAT IPv4 ports + 1 SSH, 4GB HDD and 500GB bandwidth.

#5 – Deepnet Solutions

deepnet-solutions

DeepnetSolutions.com is a Canadian-based provider which is also doing business in low end segment. They were before known on the name of Gestion DBI, NetworkChannel and TheMineator were those service is specialise into vps, webhosting and game server. The lowest NAT IPv4 plan available is $1.80/year for a VPS with 64MB RAM, 1GB HDD, 100GB bandwidth, 1x NAT IPv4, 20 Forwarded Ports + 1 SSH Port, /80 IPv6 Subnet and free DDOS protection at Montreal Canada.

#6 – Defined Code Hosting

definedcode

DefinedCodeHosting.com offers mini VPS plans with NAT IPv4 at two locations: Netherlands and France. Their Mini 64 plan is purchase-able for £4/year and you’ll get a mini box with 64MB RAM, 3GB HDD, 20 NAT IPv4 ports + 1 NAT IPv4 SSH ports. However all mini plans have no IPv6.

#7 – Host Rail

hostrail

HostRail.net is a provider specializing in NAT IPv4 vps. All their plans are NAT IPv4. Their cheapest plan is $1.49/year for a vps with 64MB RAM, 5GB RAID1 Disk, and free DDOS protection. While Lowendspirit uses HAProxy, Hostrail uses Nginx as reverse proxy which is available by ticket.

#8 – Web Rimium

webrimium

WebRimium.com is also offering mini NAT IPv4 vps plans with the cheapest one is available for $7/year for a box with 64MB RAM (burstable to 386MB), 1GB HDD, and 1 IPv6 + NAT IPv4.

#9 – DollarVZ

DollarVZ is basically another brand of Nexhost. As the name suggests, DollarVZ offers dirt cheap VPS plans starting at $1.35/year for a box with 64MB RAM, 5GB HDD, and free DDOS protection. However it has no IPv6. Node server is located at Seattle.

#10 – Swiss Node

swissnode

SwissNode.ch is a provider based in Zurich Swiss. They also offer NAT IPv4 plans for around $14/year for a VPS with 256MB RAM, 30 GB HDD and 10 IPv6.

That’s all for now. Know another? Please do not hesitate to tip me so I can add more in the list.

This post 10 Low End NAT IPv4 VPS Providers is part of ServerMom.

How to Install OpenLiteSpeed, PHP and MariaDB on CentOS 7

$
0
0

First thing first, I have to say sorry for not updating this blog with any new article because of some personal offline businesses. So here I am trying my best to get back online bringing a short tutorial, again.

Going back to laptop, this article is a tutorial with screenshots on how to install OpenLiteSpeed, PHP and MariaDB on your CentOS 7 VPS. I believe it will work on any VPS running on any vitualization either OpenVZ, KVM, or Xen. Please report back if it doesn’t.

So what is it anyway? The OpenLiteSpeed Web Server (or we may simply call it OLSWS) is the free version of its well known premium version, LiteSpeed / LSWS. It is a lightweight, high-performance web server that anyone can download it, install it, use it and even modify it freely because it is an Open Source software. It is now currently version 1.4.7 at the time of writing. I believe sometimes soon it will reach version 2.x.x.

OLSWS is still an event-driven architecture web server capable to perform fast and deliver websites faster. It is super lightweight with very minimal CPU and small memory footprint. Think OLSWS as Nginx plus ability to support Apache’s rewrite rule (.htaccess). Yet, it also has WebAdmin GUI with real-time statistics. It sounds cool enough? So let’s install it.

What You Need?

First stuff is of course a VPS running CentOS 7. I use CentOS 7 x86_64 minimal. OLSWS basically supports to run on many Operating Systems including CentOS 5, 6 and 7, Ubuntu 8.04 and up, Debian 4 and up, Solaris(x86): Sun0S 5.8 and up, OS X 10.3 and up, FreeBSD 4.5 and up. But as per the tittle of this guide, you’ll need CentOS 7 up and running on your VPS. Looking for a good VPS to try this tutorial? I believe DigitalOcean or RamNode will be a good place to start.

Also, some basic knowledge about Unix command and using Putty will help you. The last thing, you may also want to have a cup of coffee or tea placed next to your keyboard.

What Will We Do?

  1. Install OLSWS
  2. Install PHP
  3. and Install MariaDB
  4. Shortly, we are going to build a LOMP server (Linux, OLSWS, MariaDB and PHP).

Step 1 – Login to your server as root or as a user with root privilege (ability to use sudo). In this guide I simply login as root.

login-vps

Step 2 – Luckily, LiteSpeedTech has created repository so we can have a quick install. Currently it is available for only CentOS 5,6 and 7 so other OSs have to build from source or simply wait for the repo to become available. Use this command to add the repo into your VPS:

rpm -ivh http://rpms.litespeedtech.com/centos/litespeed-repo-1.1-1.el7.noarch.rpm

It should be quick and easy:

add-openlitespeed-repo

Step 3 – Now install OpenLiteSpeed with this simple yum command:

yum install openlitespeed -y

this will install OLSWS along with dependencies required.

install-olsws-yum

once done, you’ll see something like this:

olsws-installed

Step 4 – Now install MariaDB server using this simple command:

yum install mariadb-server -y

screenshot:

install-mariadb-olsws

Step 5 – Next, let’s install PHP v5.6. Just FYI that basically when OLSWS installed, there is already PHP 5.3 installed but we can replace that with newer PHP version which in this case is 5.6. Issue this command:

yum install lsphp56 lsphp56-mysql -y

screenshot:

install-php-56-olsws

Step 6 – Now enable PHP 5.6 by simply linking it into the location that OpenLiteSpeed calls when attempting to execute PHP code. Issue command below:

ln -sf /usr/local/lsws/lsphp56/bin/lsphp /usr/local/lsws/fcgi-bin/lsphp5

screenshot:

use-php-56

Step 7 – this is an important step, to change default username and password of your newly installed OLSWS. There is a file you have to execute it:

/usr/local/lsws/admin/misc/admpass.sh

Make sure you remember your newly created password.

p.s: default username is “admin” with “123456” as default password.

change-openlitespeed-password

Step 8 – Do not forget to also setup your Mariadb server:

systemctl start mariadb
systemctl enable mariadb

The first command is to start and the second one is to enable it during server reboots. Next, setup some basic configuration using this command:

mysql_secure_installation

Sorry but I don’t put screenshot pics as I write it already which you can read here.

Step 9 – That’s it. Now you can give it a test whether OLSWS is running or not:

service lsws status

pic:

check-olsws-status

Next, open up your favorite browser like Firefox and type the IP address of your VPS plus port 8088:

http://xxx.xxx.xxx.xxx:8088

olsws-welcome-page

Step 10 – You can also open OLSWS web based GUI / interface which is available via port 7080.

http://xxx.xxx.xxx.xxx:7080

olsws-admin-login

That’s all. Enjoy

Coming up next: Initial configuration of OpenLiteSpeed Web Server.

This post How to Install OpenLiteSpeed, PHP and MariaDB on CentOS 7 is part of ServerMom.

Viewing all 159 articles
Browse latest View live